- 8777701917
- info@saikatinfotech.com
- Basirhat W.B

A Distributed File System (DFS) is a logical organization that transparently groups existing file shares on multiple servers into a structured hierarchy. This hierarchy can be accessed using a single share on a DFS server.
A DFS file share can be replicated across multiple file servers in different locations to optimize server load and increase access speed to shared files. In this case, a user can access a file share on a server that is closest to them. DFS is intended to simplify access to shared files.
DFS uses the Server Message Block (SMB) protocol, which is also known as the Common Internet File System (CIFS). Microsoft’s implementation of DFS doesn’t work with other file sharing protocols like NFS or HDFS. However, you can connect multiple SMB shares configured on NAS devices and Linux machines using Samba to your DFS server running on Windows Server. DFS consists of server and client components.
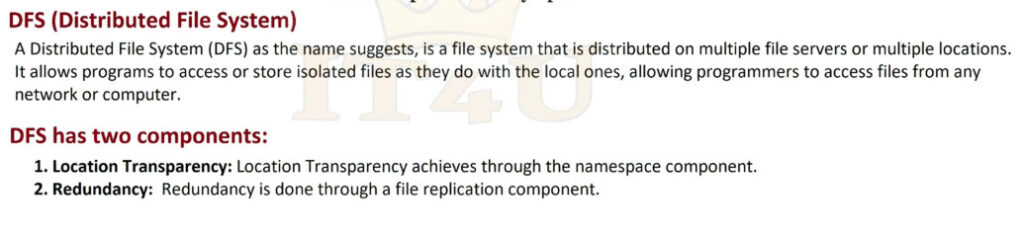
You can configure one DFS share that includes multiple file shares and connect users to this single file share using a unified namespace. When users connect to this file share using a single path, they see a tree structure of shared folders (as they are subfolders of the main share) and can access all needed file shares transparently. Underlying physical file servers hosting file shares are abstracted from the namespace used to access shares. DFS namespaces and DFS replication are the two main components used for DFS functioning.
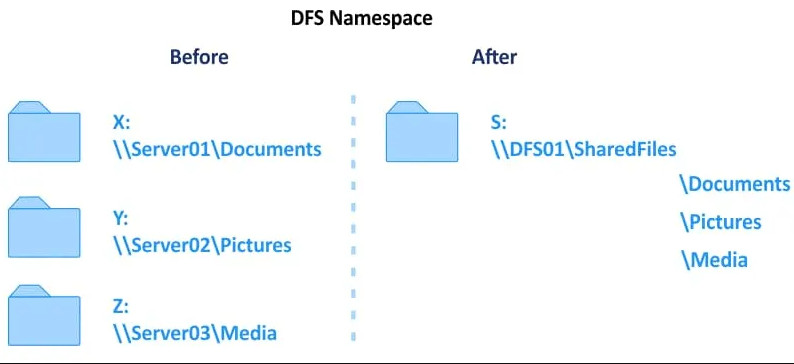
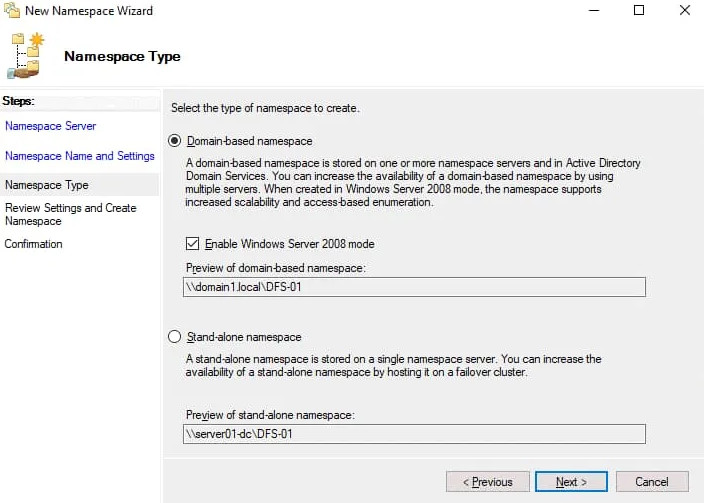
A DFS namespace is a virtual folder that contains links to shared folders stored on different file servers. DFS namespaces can be organized in different ways depending on business needs. They can be organized by geographical location, organization units, a combination of multiple parameters, etc. You can configure multiple namespaces on a DFS server. A DFS namespace can be standalone or domain-based.
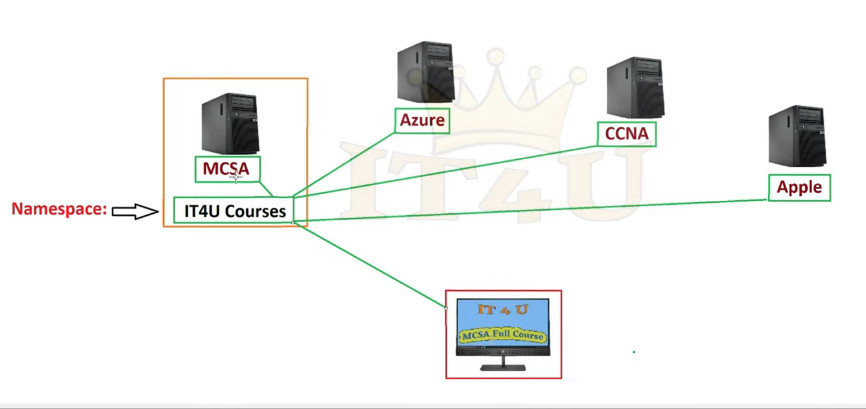
A namespace consists of the root, links (folders), and folder targets.
\\ServerName\RootName (a standalone namespace)
\\DomainName\RootName (a domain-based namespace)
The DFS tree structure includes the following components:
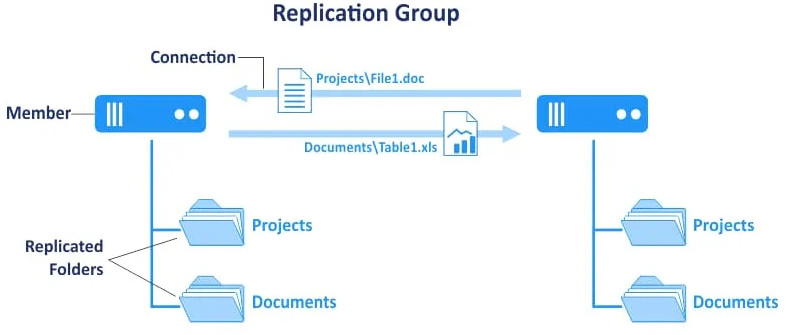
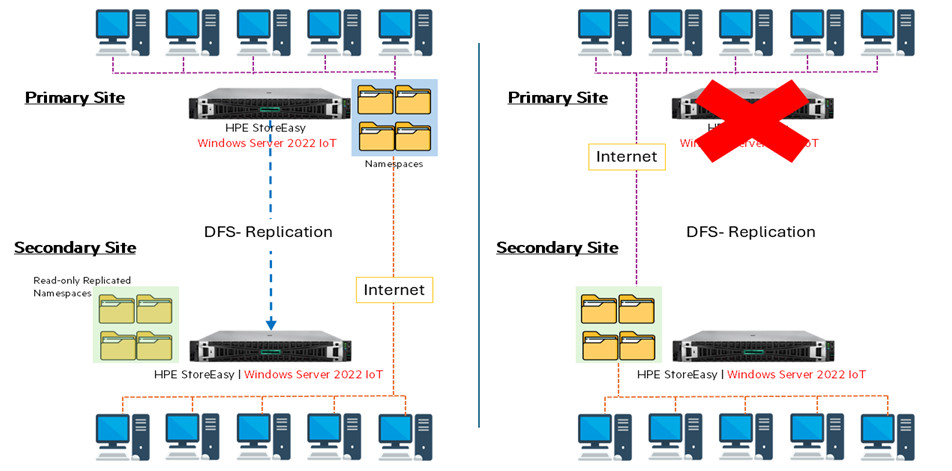
DFS replication is a feature used to duplicate existing data by replicating copies of that data to multiple locations. Physical file shares can be synchronized with each other at two or more locations.
An important feature of DFS replication is that the replication of a file starts only after that file has been closed. For this reason, DFS replication is not suitable for replicating databases, given that databases have files opened during the operation of a database management system. DFS replication supports multi-master replication technology, and any member of a replication group can change data that is then replicated.
A DFS replication group is a group of servers participating in the replication of one or multiple replication folders. A replicated folder is synchronized between all members of the replication group.
DFS replication uses a special Remote Differential Compression algorithm that allows DFS to detect changes and copy only changed blocks of files instead of copying all data. This approach allows you to save time and reduce replication traffic over the network.
DFS replication is performed asynchronously. There can be a delay between writing changes to the source location and replicating those changes to the target location.
There are two main DFS replication topologies:
The main requirement is using Windows Server 2008 DataCenter or Enterprise editions, Windows Server 2012, or a newer Windows Server version. It is better to use Windows Server 2016 or Windows Server 2019 nowadays.
NTFS must be a file system to store shared files on Windows Server hosts.
If you use domain-based namespaces, all servers of a DFS replication group must belong to one Active Directory forest.
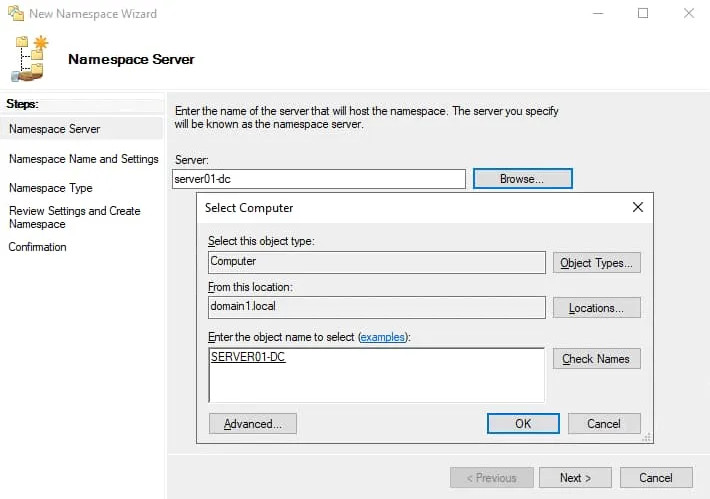
You need to prepare at least two servers. In this example, we use two machines running Windows Server 2019, one of which is an Active Directory domain controller:
This is because configuring DFS in a domain environment has advantages compared to Workgroup, as explained above. The domain name is domain1.local in our case. If you use a domain, don’t forget to configure Active Directory backup.
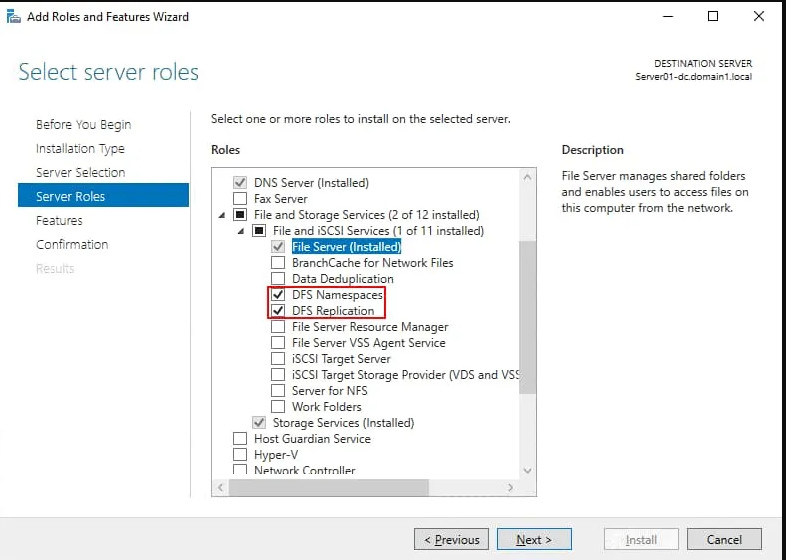
First of all, you need to enable the DFS roles in Windows Server 2019.
Create at least one shared folder on any server that is a domain member. In this example, we create a shared folder on our domain controller. The folder name is shared01 (D:\DATA\shared01).
Now the share is available at this address:
\\server01-dc\shared01
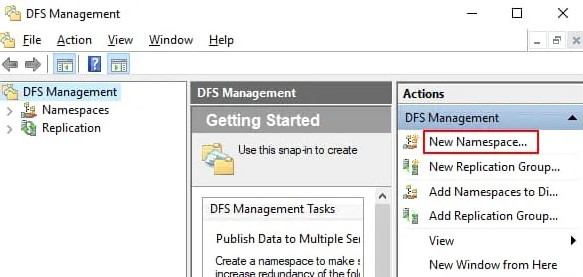
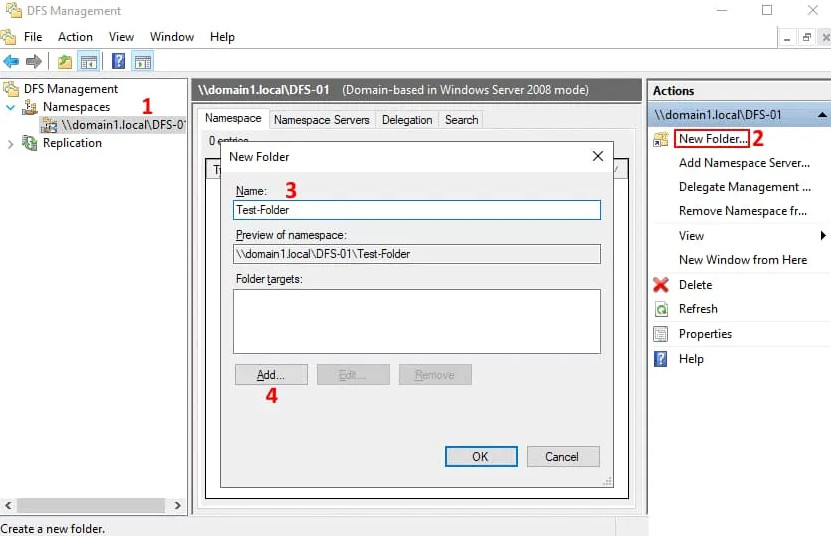
Let’s create a DFS namespace to link shared folders in a namespace.
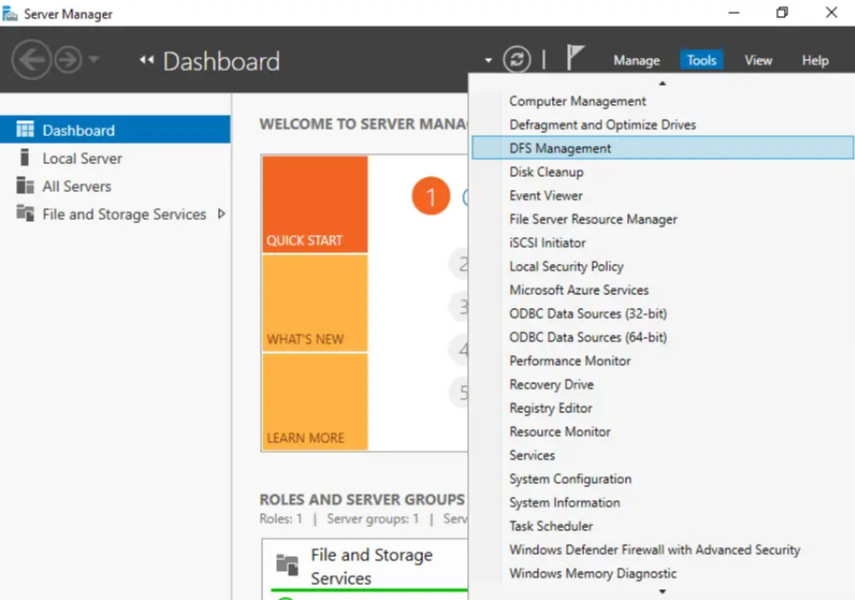
As an alternative, you can click Start > Windows Administrative Tools > DFS Management.
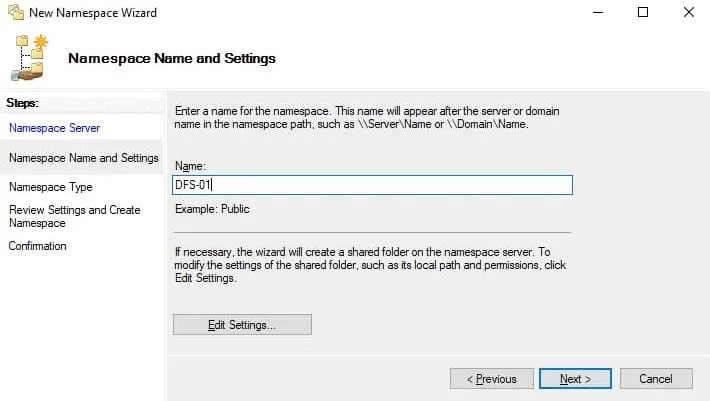
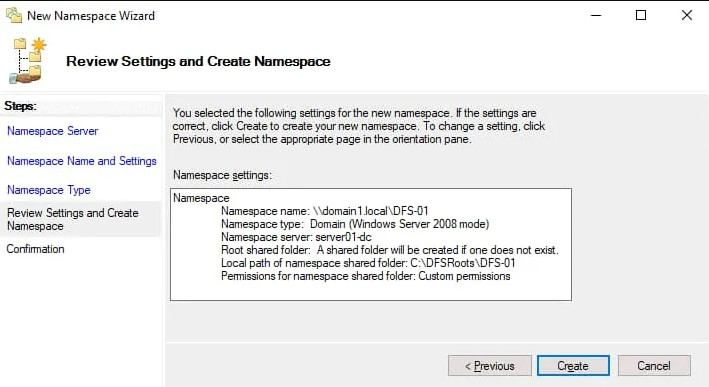
Pay attention to the local path of a shared folder. Change this path if needed. We use the default path in our example (C:\DFSRoots\DFS-01).

It is recommended that you use a Domain-based namespace due to advantages such as high DFS namespace availability by using multiple namespace servers and transferring namespaces to other servers.
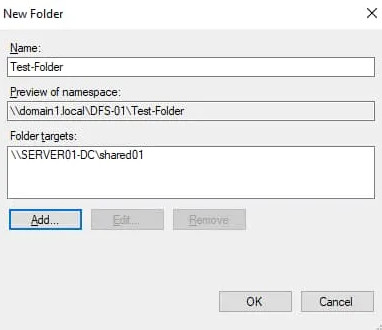
Now we need to add a new folder into the existing namespace. We are adding a folder on the same server, which is a domain controller, but this method is applicable for all servers within a domain.

The folder target has been added.
Now you can access the shared folder by entering the network address in the address bar of Windows Explorer:
\\server01-dc\dfs-01\Test-Folder
You should enter a path in the format:
\\DomainName\DFS-NameSpace\

The Distributed File System (DFS) is a set of client and server services that allow an organization using Microsoft Windows servers to organize many distributed SMB file shares into a hierarchical namespace. This system provides a tree-like structure that logically represents file data sources across the network.
At its core, DFS offers two key components: DFS Namespaces and DFS Replication. DFS Namespaces enables the creation of a single namespace that aggregates various shared folders from different servers. DFS Replication, on the other hand, synchronizes folder content across multiple servers to ensure copies of the data are consistent and up-to-date.
The implementation of DFS Replication and DFS Share brings forth numerous advantages:
Before diving into the configuration of DFS, it’s crucial to ensure that your system meets all necessary prerequisites and that you’ve performed all compatibility checks. This preparation is the foundation upon which a reliable and effective DFS setup is built.
To implement DFS, you need to have a network environment running Windows Server. Here are the specific system requirements and compatibility considerations:
Certain roles and features must be installed on your Windows Server to use DFS. These include:
DFS relies on Active Directory Domain Services (AD DS) for configuration and replication. Here are some Active Directory considerations:
Installing DFS roles is a straightforward process, it can be installed utilizing the user-friendly Server Manager with its graphical interface or using PowerShell.
This section involves using Server Manager to add necessary roles and features. Here’s how to do it:
To use PowerShell to install DFS Replication and the DFSR RSAT management tools, use the following cmdlet:
DFS Replication uses a multi-master replication model, which means that any member of the replication group can receive updates and replicate those changes to other members of the group. This model is efficient and reliable, ensuring that if one server goes down, the others can continue to provide access to the shared data. The replication is based on the Remote Differential Compression (RDC) protocol, which transfers only the changed portions of files, reducing the amount of data sent across the network and improving replication efficiency.
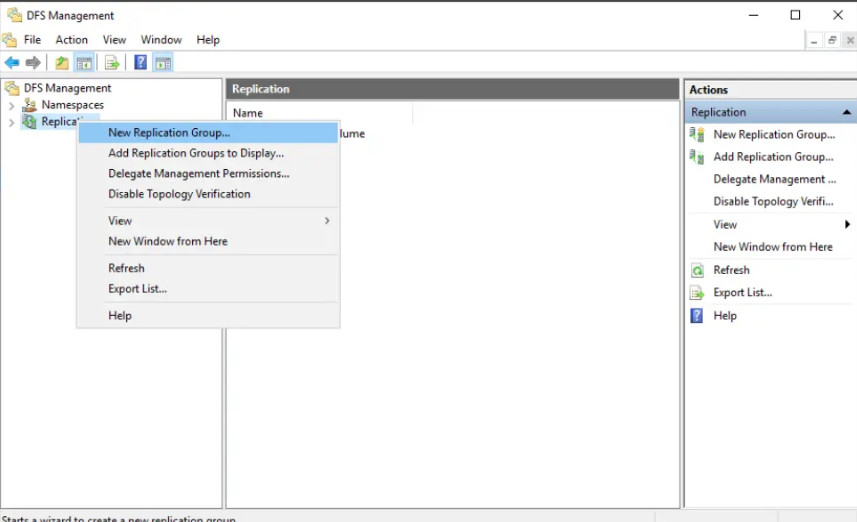
To set up DFS Replication, you first need to create a replication group, which is a collection of file servers that will synchronize data among themselves. Here’s how to create one:
Launch the DFS Management console from the Server Manager or by searching for it in the start menu.
Right-click on ‘Replication’ and select ‘New Replication Group’ to start the New Replication Group Wizard.
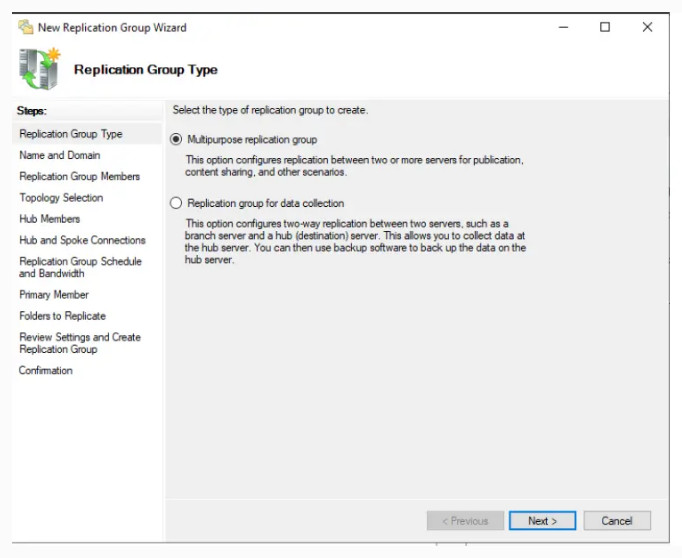
Choose the ‘Multi-purpose replication group’ option for the most flexibility and enter a name for the group.
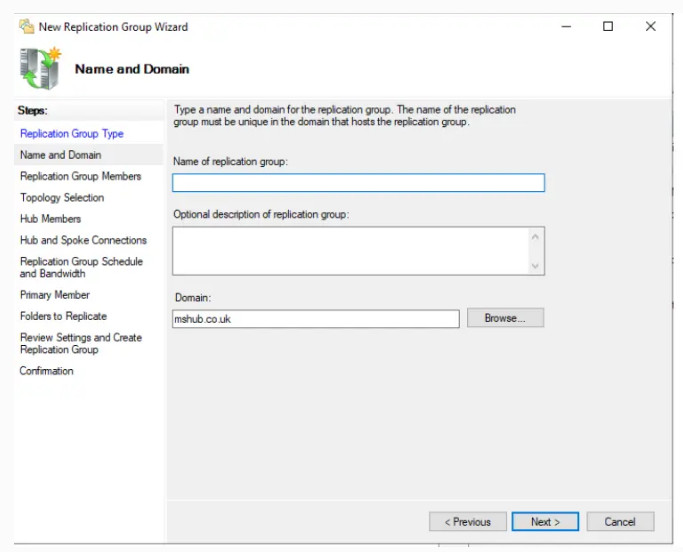
Enter a name for the replication group that adheres to your naming conventions.
Add server names that will become members of the replication group.

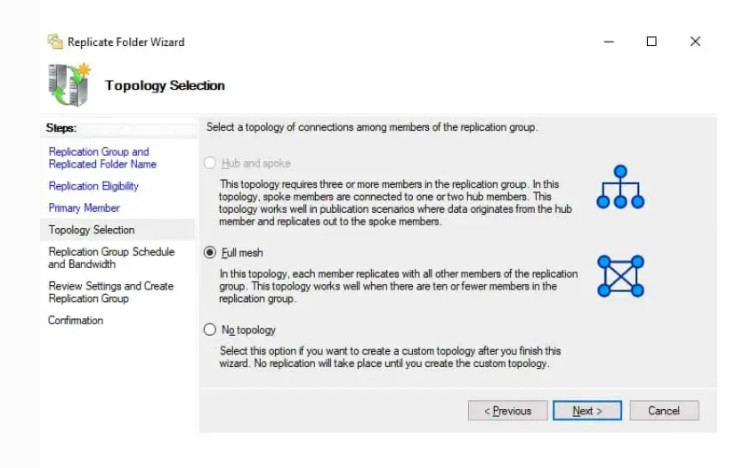
Decide on the topology for replicating data. You can choose from hub-and-spoke, full mesh, or a custom topology based on your network’s needs.
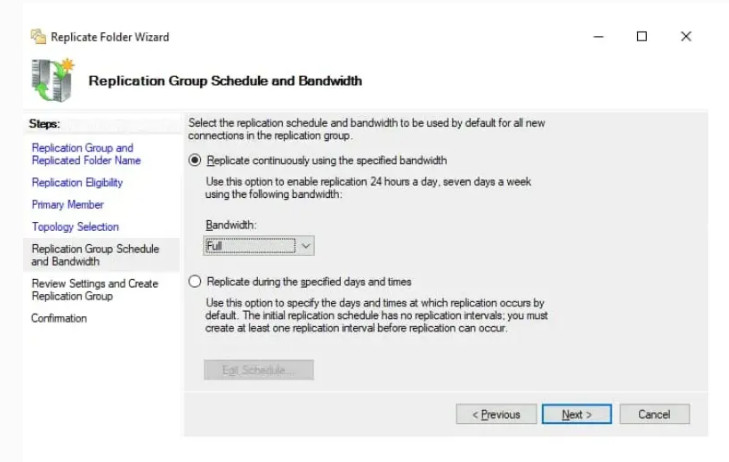
Choose between “replicate continuously using the specific bandwidth” and “Replicate during specific days and times”
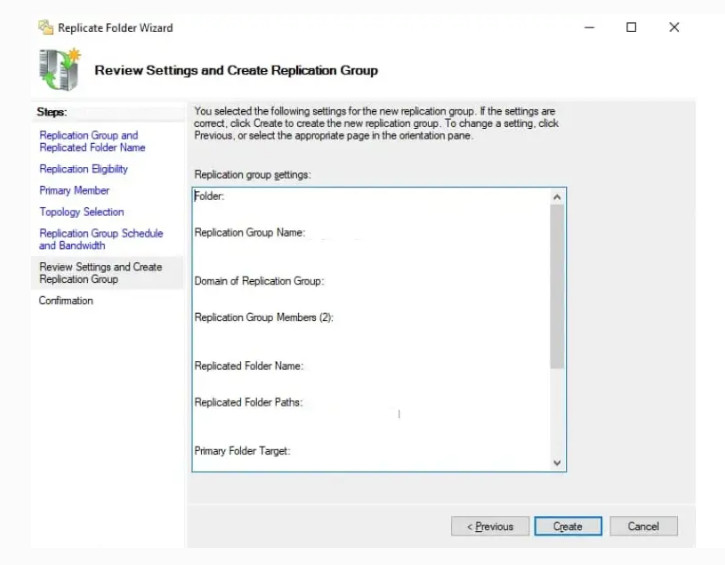
Review all the settings for the replication group and the replicated folders. Once confirmed, finish the wizard to create the replication group.
After creating the replication group, you need to add the folders you wish to replicate: 2019
Once you have set up DFS Replication, the next step is to configure a DFS Share, which is the process of sharing a folder on the network and integrating it with DFS. This allows for centralized management of shared folders and ensures that users have access to the data they need.
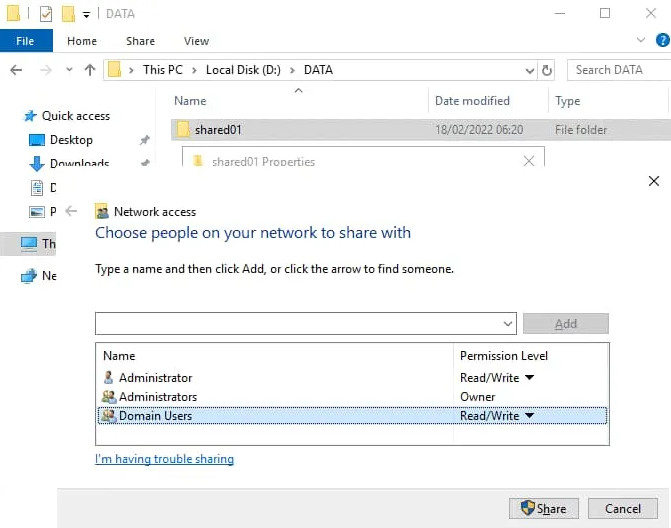
Before a folder can be added to a DFS Namespace, it must be shared on the network. Follow these steps to share a folder:
With the folder shared on the network, you can now integrate it into your DFS Namespace:
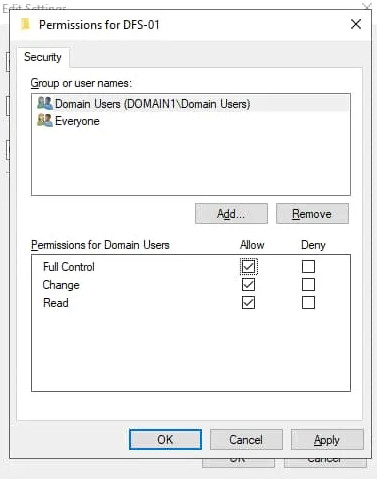
Proper permissions are crucial to secure the data within the shared folders and to control access:
Effective management of DFS Replication group settings is essential to ensure that the replication process aligns with organizational requirements and network capacity. This includes configuring replication schedules, adjusting bandwidth, and selecting an appropriate replication topology, as well as monitoring the health and performance of replication.
The replication schedule determines when data replication occurs and can be configured to minimize the impact on network resources during peak hours:
Bandwidth and topology settings are critical for managing how data is replicated across the network and ensuring efficient use of resources:
Regular monitoring of DFS Replication is necessary to identify and resolve issues promptly:
DFS Replication offers a suite of advanced features that can optimize and refine the replication process. These features include using replication filters, leveraging Remote Differential Compression (RDC), and managing conflict resolution and pre-seeding of data. Understanding and implementing these features can significantly enhance the efficiency and reliability of DFS
DFS is a robust and reliable service, but like any complex system, issues can arise. Knowing how to diagnose and resolve common replication errors, recover from failures, and utilize the right tools is essential for maintaining a healthy DFS environment.
When faced with replication issues, start with the following steps:
If DFS Replication fails, follow these steps to recover: