Port forwarding

What is Port Forwarding?

Port forwarding is a technique used to enable external devices to connect to services on a private network by redirecting network traffic from a router’s public IP address to a specific internal IP address and port. This is essential for services that require direct access, such as gaming, remote desktop applications, and web hosting.


Purpose of Port Forwarding

Access Services: Allows external users to access applications running on a device in a local network.Improve Connectivity: Enhances the ability of devices to communicate over the internet, especially for gaming and VoIP applications.- Hosting: Enables hosting of servers (like game servers or web servers) that can be accessed from outside the local network.


Common Uses

1. Online Gaming: Many multiplayer games require specific ports to be open for players to connect to game servers.


2. Remote Access: Services like Remote Desktop, FTP servers, and security cameras often need port forwarding to be accessible over the internet.


3.Web Hosting: If you want to host a website from a local machine, port forwarding is essential to direct traffic to the correct device.


How to Set Up Port Forwarding

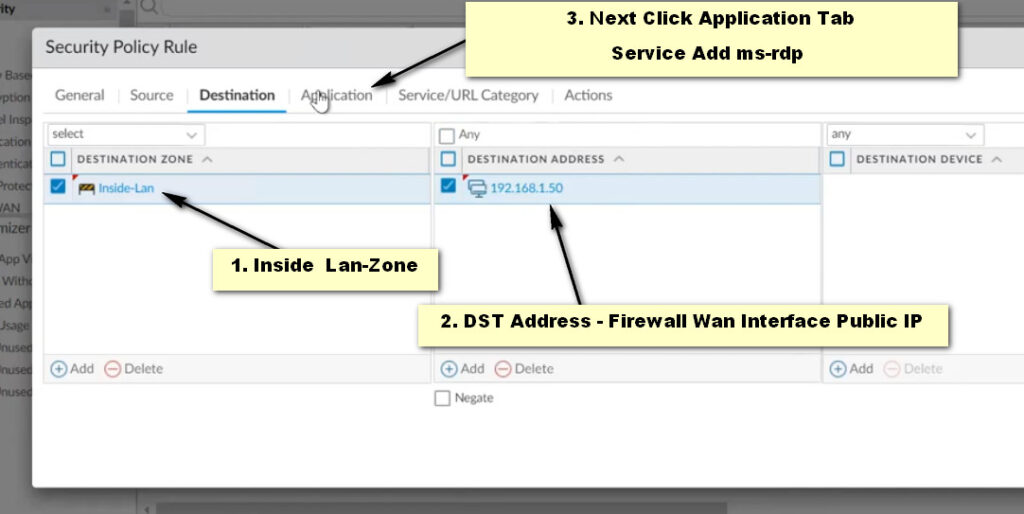
1. Determine Your Internal IP Address:
 Find the IP address of the device you want to forward traffic to. This can usually be found in the network settings of the device.


2. Log into Your Router:
– Open a web browser and enter your router’s IP address (commonly 192.168.1.1 or 192.168.0.1).

– Enter your router’s admin credentials.


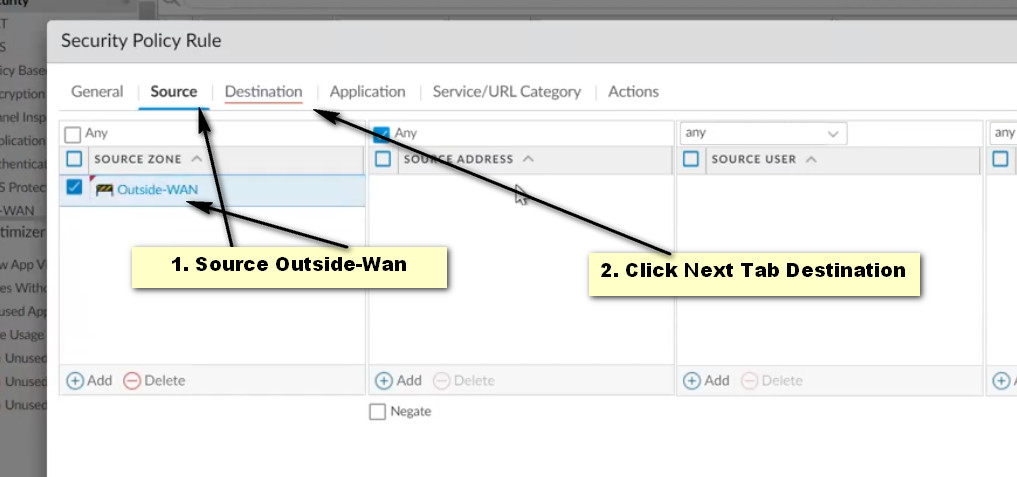
3. Navigate to the Port Forwarding Section:
– Look for options like “Port Forwarding,” “Virtual Server,” or “NAT/QoS” in the router settings.


4. Add a Port Forwarding Rule:
– External Port: The port on which the router listens for incoming traffic.

– Internal IP Address: The IP address of the device you’re forwarding to.

– Internal Port: The port on the device that will handle the incoming traffic (often the same as the external port).

– Protocol: Choose TCP, UDP, or both, depending on the application’s requirements.
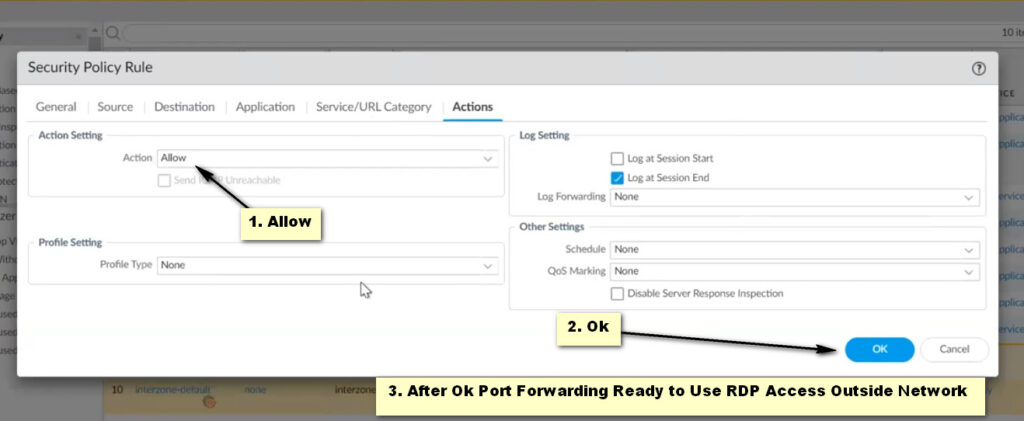
 

5. Save and Test:
– Save your changes and restart your router if necessary.

– Use an external network (like mobile data) to test if you can access the service.

Important Considerations


Security Risks: Port forwarding can expose your devices to potential attacks. Always ensure that:
– Services are secured with strong passwords.
– Software is up-to-date.
– Only necessary ports are forwarded.

– Static IP Address: It’s advisable to assign a static IP address to the device you’re forwarding to, to prevent IP address changes that could break the forwarding rules.


Firewall Configuration: Ensure that any firewalls on your router or device are configured to allow traffic through the forwarded ports.

– ISP Restrictions: Some Internet Service Providers may block certain ports or restrict port forwarding; check with your ISP if you encounter issues.

Network Port No 

Configuring port forwarding on a Palo Alto Networks firewall involves setting up a NAT (Network Address Translation) rule and a security policy. Here’s a step-by-step guide:

Steps to Configure Port Forwarding on Palo Alto Firewall

1. Log into the Web Interface

  • Open a web browser and enter the IP address of your Palo Alto firewall.
  • Log in with your admin credentials.
 

2. Create a NAT Policy

  • Go to Policies > NAT.
  • Click on Add to create a new NAT rule.
 
NAT Rule Configuration
  • General Tab:

    • Name: Give your NAT rule a descriptive name.
    • Type: Select Destination NAT.
  • Original Packet Tab:

    • Source Zone: Choose the zone where the traffic will originate (usually the internet or untrust zone).
    • Destination Zone: Choose the zone that represents your internal network (usually trust).
    • Destination Address: Enter the public IP address or leave it as “any” if you want to catch all incoming requests.
    • Application: You can specify an application if needed (optional).
    • Service: Select the service or port you want to forward (e.g., HTTP, HTTPS, or custom port).
  • Translated Packet Tab:

    • Destination Address: Enter the internal IP address of the device you want to forward traffic to.
    • Service: Specify the same service as in the original packet section, or select a different one if applicable.
  • Actions Tab:

    • Ensure NAT Type is set to Destination NAT.
  • Click OK to save the NAT rule.


3. Create a Security Policy

  • Go to Policies > Security.
  • Click on Add to create a new security rule.
Security Policy Configuration
  • General Tab:

    • Name: Give your security rule a descriptive name.
  • Source Tab:

    • Source Zone: Select the zone from which the traffic is coming (e.g., untrust).
    • Source Address: You can set to “any” or specify IP addresses as needed.
  • Destination Tab:

    • Destination Zone: Select the zone where the internal device resides (e.g., trust).
    • Destination Address: Enter the internal IP address of the device you’re forwarding to (this should match the NAT rule).
  • Application Tab:

    • Select the application or leave it as “any” if you want to allow all applications.
  • Service/URL Category Tab:

    • Choose the same service you specified in the NAT rule.
  • Action Tab:

    • Set the action to Allow.
  • Click OK to save the security policy.


4. Commit the Changes

  • After setting up the NAT and security rules, click on the Commit button in the upper right corner to apply your changes.

5. Testing

  • Test the configuration by attempting to access the service from an external network (e.g., using a mobile device on a cellular network).
  • Ensure that the correct port is reachable.

Important Considerations

  • Logging: Consider enabling logging on the security rule to monitor traffic.
  • Security: Make sure that any exposed services are secured with appropriate credentials and firewalls.
  • Firewall Rules: Verify that there are no other conflicting rules that may block the traffic.