Palo Alto Networks next-generation firewalls are based on a unique Single Pass Parallel Processing (SP3) Architecture – which enables high-throughput, low-latency network security, even while incorporating unprecedented features and technology.

Palo Alto Networks solves the performance problems that plague today’s security infrastructure with the SP3 architecture, which combines two complementary components:


Single Pass software
Parallel Processing hardware

The results is the perfect mix of raw throughput, transaction processing and network security that today’s high performance networks require.


Single Pass Software

Palo Alto Networks Single Pass software is designed to accomplish two key functions within the Palo Alto Networks next-generation firewall. First, the single pass software performs operations once per packet. As a packet is processed, networking functions, policy lookup, application identification and decoding, and signature matching for any and all threats and content are all performed just once. This significantly reduces the amount of processing overhead required to perform multiple functions in one security device. Second, the content scanning step in Palo Alto Networks’ Single Pass software is stream-based, and uses uniform signature matching to detect and block threats.  Instead of using separate engines and signature sets (requiring multi-pass scanning) and instead of using file proxies (requiring file download prior to scanning), the single pass software in our next-generation firewalls scans content once and in a stream-based fashion to avoid latency introduction.


This Single Pass traffic processing enables very high throughput and low latency – with all security functions active.  It also offers the additional benefit of a single, fully integrated policy, enabling simple, easier management of enterprise network security.


Parallel Processing Hardware

The other critical piece of Palo Alto Networks SP3 Architecture is hardware. Palo Alto Networks next-generation firewalls use Parallel Processing hardware to ensure that the Single Pass software runs fast. First, Palo Alto Networks engineers designed separate data and control planes. This separation means that heavy utilization of one won’t negatively impact the other – for example, an administrator could be running a very processor-intensive report, and yet the ability to process packets would be completely unhindered, due to the separation of data and control planes.


The second important element of the Parallel Processing hardware is the use of discrete, specialized processing groups that work in harmony to perform several critical functions.


Networking: routing, flow lookup, stats counting, NAT, and similar functions are performed on network-specific hardware
User-ID, App-ID, and policy all occur on a multi-core security engine with hardware acceleration for encryption, decryption, and decompression.


Content-ID content analysis uses dedicated, specialized content scanning engine
On the controlplane, a dedicated management processor (with dedicated disk and RAM) drives the configuration management, logging, and reporting without touching data processing hardware.


The combination of Single Pass software and Parallel Processing hardware is completely unique in network security, and enables Palo Alto Networks next-generation firewalls to restore visibility and control to enterprise networks at very high levels of performance.

Frequently Asked Questions

In this section, we will answer some common questions related to the Palo Alto Data Plane CPU.


1. What is the Palo Alto Data Plane CPU?

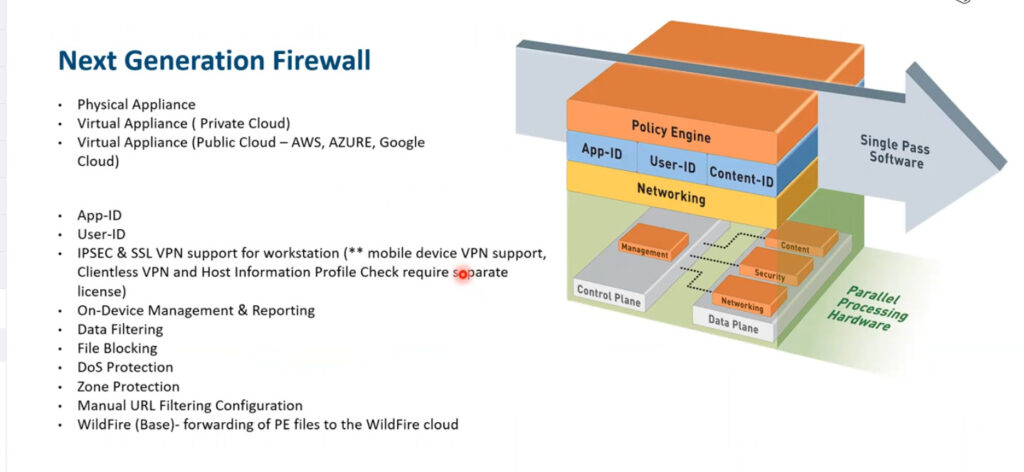
The Palo Alto Data Plane CPU is a key component of Palo Alto Networks’ Next-Generation Firewalls. It is responsible for processing and forwarding network traffic, allowing the firewall to enforce security policies and protect the network from threats. The Data Plane CPU handles the heavy workload of inspecting packets, applying security policies, and performing tasks such as decryption and encryption.

By offloading these tasks to a dedicated processor, the Data Plane CPU ensures that the firewall’s performance is not compromised, even under high network traffic conditions. It provides the necessary speed and throughput to handle the increasing demands of modern networks and enables advanced security features without impacting the overall system performance.


2. How does the Palo Alto Data Plane CPU improve network security?

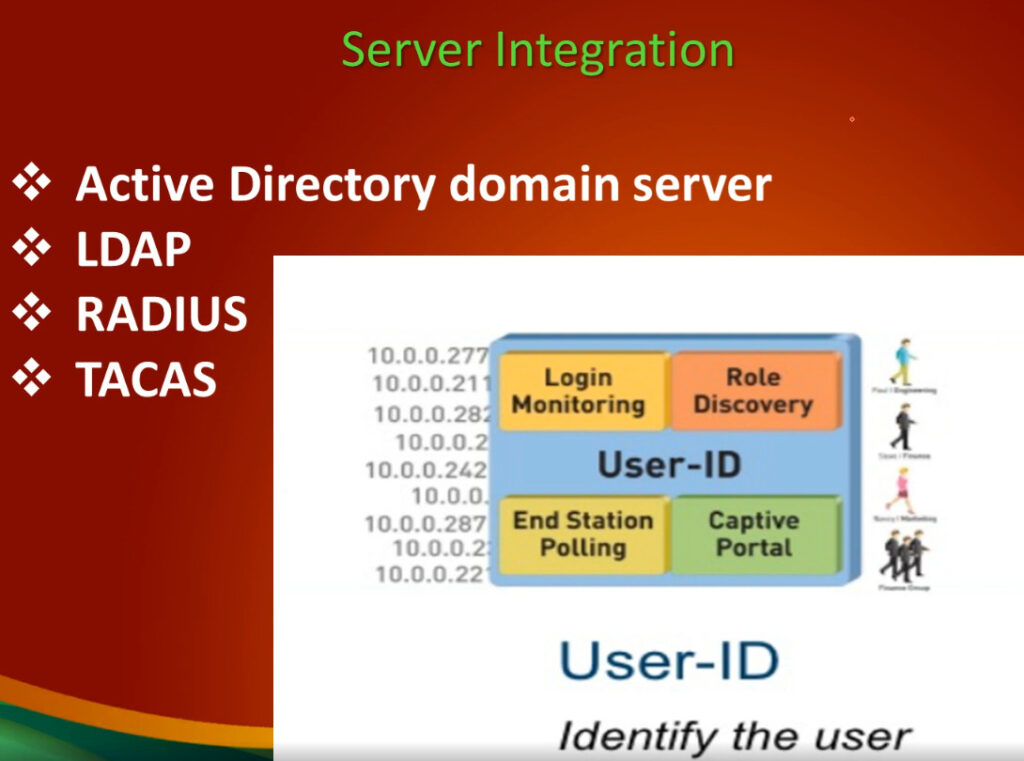
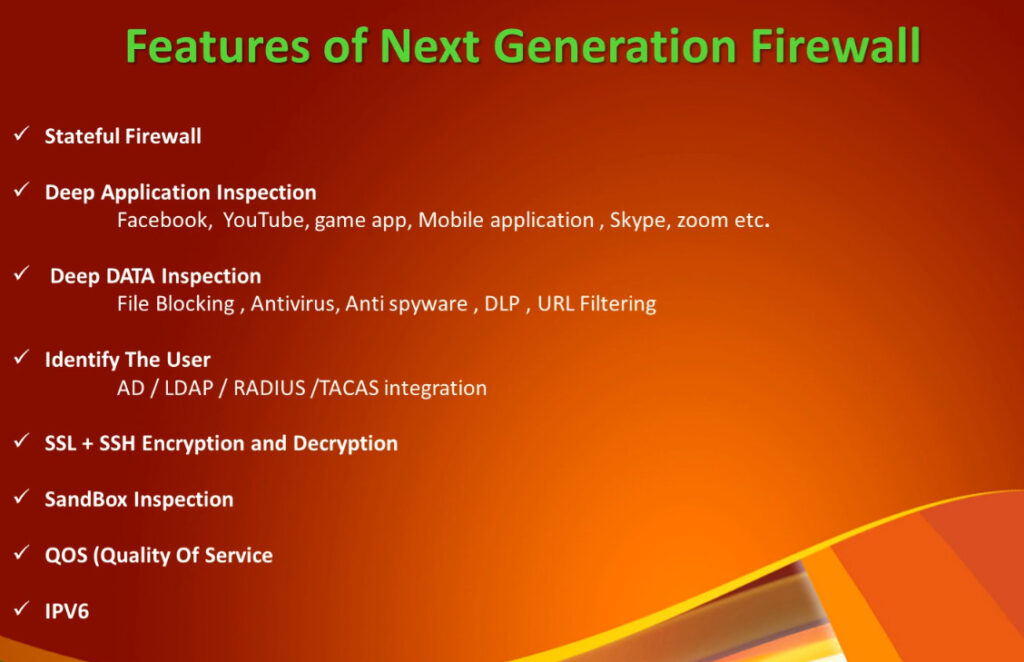
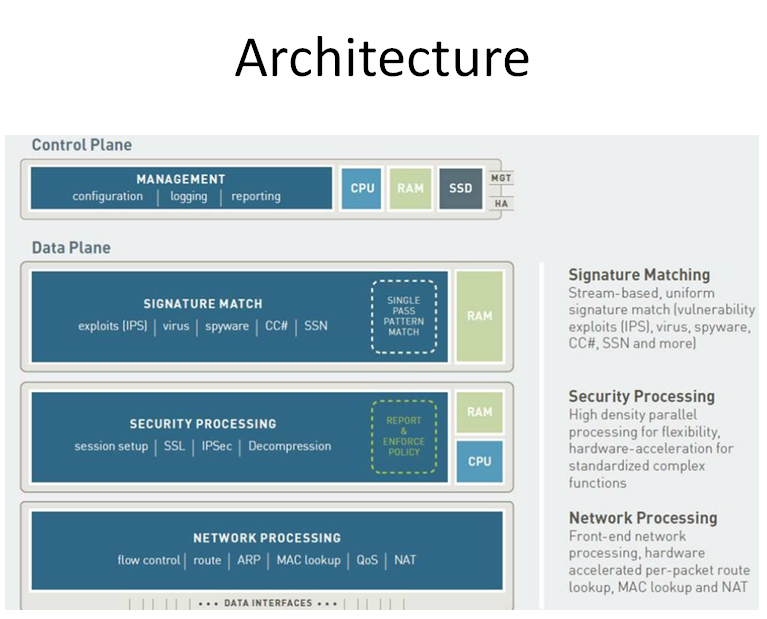
The Palo Alto Data Plane CPU plays a crucial role in improving network security by efficiently processing network traffic and applying security policies. It inspects every packet passing through the firewall, looking for threats, vulnerabilities, or malicious behavior. It can identify and block known malware, viruses, and malicious websites, protecting the network from various cyber threats.

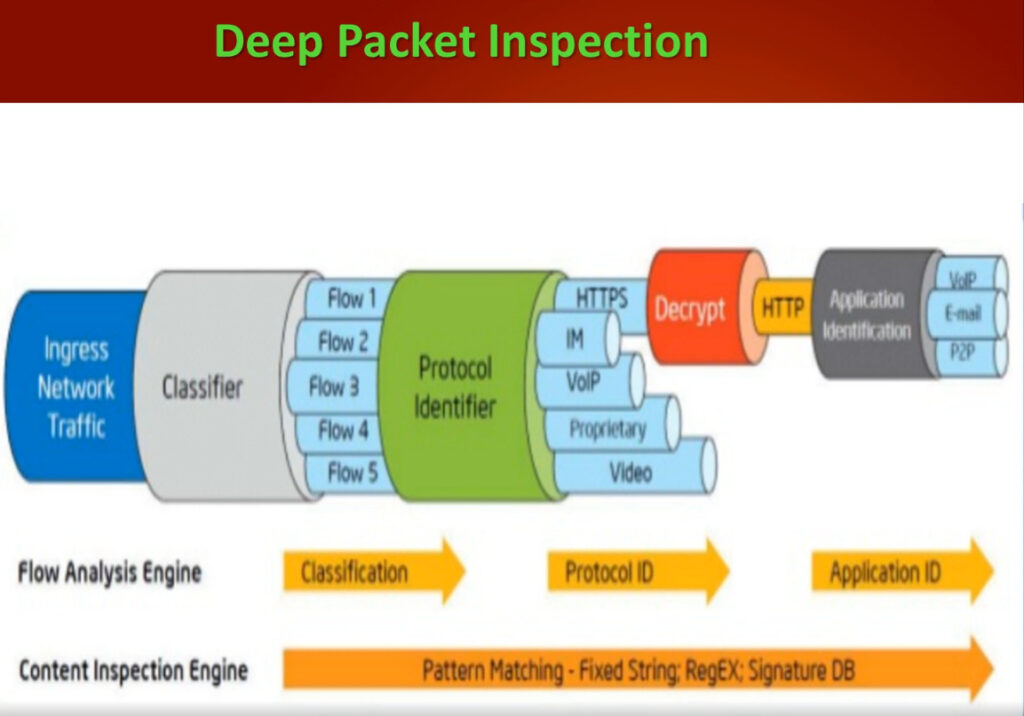
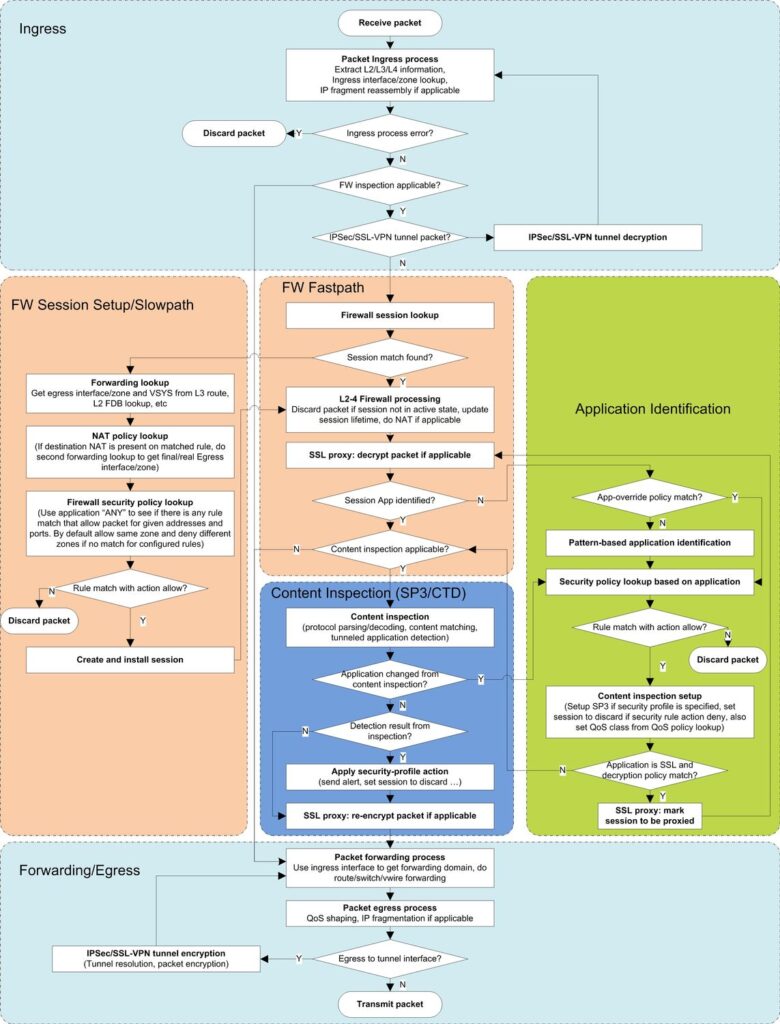
Moreover, the Data Plane CPU can analyze packet payloads and perform deep packet inspection, allowing it to detect and block advanced threats hiding within encrypted traffic. It can enforce security policies based on various parameters such as application, user, content, and threat intelligence, ensuring that only authorized and secure traffic is allowed to pass through.


3. Can the Palo Alto Data Plane CPU handle high network traffic loads?

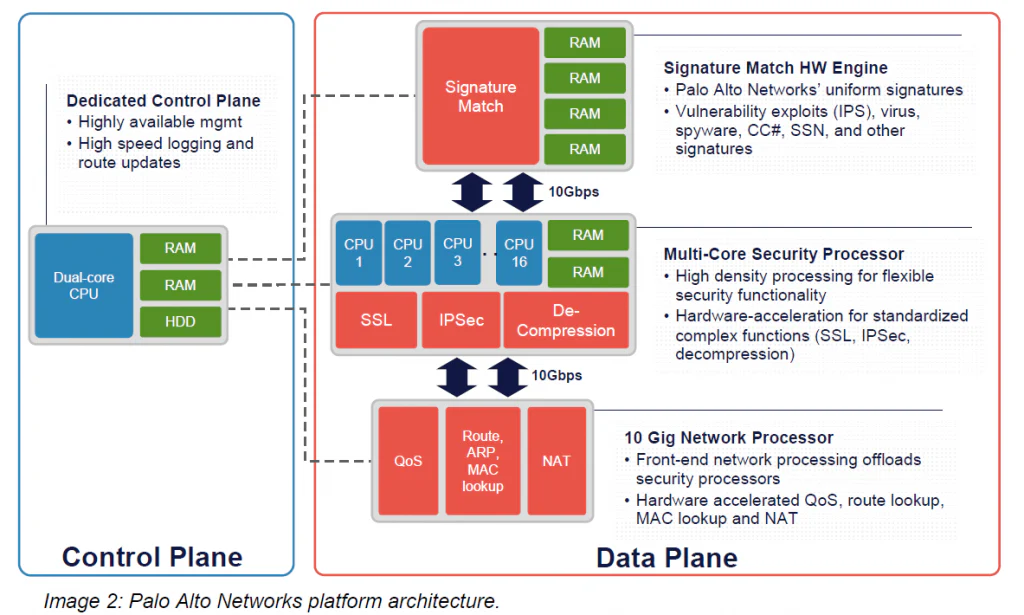
Yes, the Palo Alto Data Plane CPU is designed to handle high network traffic loads. It is built with powerful processing capabilities and advanced hardware acceleration techniques to ensure optimal performance even during peak network traffic conditions. It can process and inspect network packets at wire speed, ensuring minimal latency and no impact on network performance.


Palo Alto Networks’ Next-Generation Firewalls, powered by the Data Plane CPU, are widely used in enterprise environments where high-performance and reliable security are essential. The Data Plane CPU’s ability to scale and handle large traffic volumes makes it suitable for organizations with demanding network requirements.


4. Can the Data Plane CPU be upgraded or replaced?

The Data Plane CPU is an integral part of Palo Alto Networks’ Next-Generation Firewalls and is not a user-replaceable component. It is designed and optimized to work seamlessly with the firewall’s architecture, ensuring optimal performance and security. While other components of the firewall, such as memory or storage, may be upgraded, the Data Plane CPU cannot be upgraded or replaced independently.


If there is a need for more processing power or higher throughput, organizations can consider upgrading to a higher model or capacity firewall that comes with a more powerful Data Plane CPU. Palo Alto Networks offers a range of firewall models with varying performance levels to cater to different network requirements.


5. What are some best practices for optimizing the Palo Alto Data Plane CPU performance?

To optimize the performance of the Palo Alto Data Plane CPU, consider the following best practices:

a. Traffic Offloading: Offload non-security related traffic, such as data backup or software updates, to separate networks or dedicated links to reduce the load on the Data Plane CPU.


b. Security Policy Optimization: Review and optimize security policies to reduce the number of unnecessary rules and improve rule efficiency. This helps reduce the processing overhead on the Data Plane CPU.


c. Application-based Policies: Utilize application-based policies to prioritize critical applications and allocate appropriate resources, reducing the burden on the Data Plane CPU.


d. Threat Prevention: Enable and configure threat prevention features such as antivirus, anti-spyware, and URL filtering to ensure comprehensive protection without impacting the Data Plane CPU’s performance.


e. Firmware Updates: Keep the firewall firmware up to date with the latest security patches and updates provided by Palo Alto Networks to benefit from performance improvements and bug fixes.

In summary, the Palo Alto Data Plane CPU is a crucial component of Palo Alto Networks’ firewall technology. It is responsible for processing network traffic and ensuring the efficient operation of the firewall.


The Data Plane CPU plays a vital role in analyzing and enforcing security policies, as well as performing tasks like packet inspection and deep packet inspection. Its high-performance capabilities enable fast and accurate traffic analysis, enhancing network security and protecting against various threats.

Paloalto Packet Flow

By default, the PA-Series firewall has an IP address of 192.168.1.1 and a username/password of admin/admin. For security reasons, you must change these settings before continuing with other firewall configuration tasks. You must perform these initial configuration tasks either from the MGT interface, even if you do not plan to use this interface for your firewall management, or using a direct serial connection to the console port on the firewall.
 

Step-1  Install your firewall and connect power to it

  • If your firewall model has dual power supplies, connect the second power supply for redundancy. Refer to the hardware reference guide for your model for details

Step-2  Gather the required information from your network administrator

  • IP address for MGT port
  • Netmask
  • Default gateway
  • DNS server address

Step-3  Connect your computer to the firewall.

You can connect to the firewall in one of the following ways: 
  • Connect a serial cable from your computer to the Console port and connect to the firewall using terminal emulation software (9600-8-N-1). Wait a few minutes for the boot-up sequence to complete; when the firewall is ready, the prompt changes to the name of the firewall, for example PA-220 login.
  • Connect an RJ-45 Ethernet cable from your computer to the MGT port on the firewall. From a browser, go to https://192.168.1.1.

You may need to change the IP address on your computer to an address in the 192.168.1.0/24 network, such as 192.168.1.2, to access this URL.

Step-4  When prompted, log in to the firewall.

You must log in using the default username and password (admin/admin). The firewall will begin to initialize.
 

Step-5   Set a secure username and password for the admin account

Notes:- 
Starting with PAN-OS 9.0.4, the predefined, default administrator password (admin) must be changed on the first login on a device. The new password must be a minimum of eight characters and include a minimum of one lowercase and one uppercase character, as well as one number or special character. Although you don’t have to configure a new username, it is a best practice to do so and to use unique usernames and passwords for each administrator. Beginning with PAN-OS 10.2, the login must include at least one alphabetical character or symbol (underscore, period, or hyphen, although a hyphen cannot be the first character in the username) and cannot be numbers only.
 
  1. Select Device Administrators.
  2. Select the admin role.
  3. Enter the current default password and the new password.
4. Click OK to save your settings.
 
Step-6  Configure the MGT interface
  1. Select Device Setup Interfaces and edit the Management interface.
  2. Configure the address settings for the MGT interface using one of the following methods:

    • To configure static IP address settings for the MGT interface, set the IP Type to Static and enter the IP Address, Netmask, and Default Gateway.
    • To dynamically configure the MGT interface address settings, set the IP Type to DHCP Client. To use this method, you must Configure the Management Interface as a DHCP Client.

Notes:- 

To prevent unauthorized access to the management interface, it is a an administrative best practice to Add the Permitted IP Addresses from which an administrator can access the MGT interface.

        3. Set the Speed to auto-negotiate.
        4. Select which management services to allow on the interface.
 
Notes:- 
Make sure Telnet and HTTP are not selected because these services use plaintext and are not as secure as the other services and could compromise administrator credentials.
5. Click OK.
 

Step-7  Configure DNS, update server, and proxy server settings.

 
Notes:- 
You must manually configure at least one DNS server on the firewall or it will not be able to resolve hostnames; it will not use DNS server settings from another source, such as an ISP.
 
  1. Select Device Setup Services.

    • For multi-virtual system platforms, select Global and edit the Services section.
    • For single virtual system platforms, edit the Services section.
  2. On the Services tab, for DNS, select one of the following:

    • Servers—Enter the Primary DNS Server address and Secondary DNS Server address.
    • DNS Proxy Object—From the drop-down, select the DNS Proxy that you want to use to configure global DNS services, or click DNS Proxy to configure a new DNS proxy object.
     

     Public DNS Server Address  

     Cloudflare DNS Servers 

    Primary DNS: 1.1.1.1
    Secondary DNS: 1.0.0.1
    They also have IPv6 public DNS servers:

    Primary DNS: 2606:4700:4700::1111
    Secondary DNS: 2606:4700:4700::1001

     Google DNS Servers 

    Google Public DNS promises three core benefits:
    a faster browsing experience, improved security,
    and accurate results without redirects.
    It’s what I use on my devices.

    Primary DNS: 8.8.8.8
    Secondary DNS: 8.8.4.4

    There are also IPv6 versions:

    Primary DNS: 2001:4860:4860::8888
    Secondary DNS: 2001:4860:4860::8844

    Google can achieve fast speeds with its public DNS servers because they’re hosted in data
    centers all around the world, meaning that when you attempt to access a web page using
    the IP addresses above, you’re directed to a server that’s nearest to you. In addition to
    traditional DNS over UDP/TCP, Google provides DNS over HTTPS (DoH) and TLS (DoT).

Click OK.
 

Step-8  Configure date and time (NTP) settings.

  1. Select Device Setup Services.

    • For multi-virtual system platforms, select Global and edit the Services section.
    • For single virtual system platforms, edit the Services section.
  2. On the NTP tab, to use the virtual cluster of time servers on the Internet, enter the hostname pool.ntp.org as the Primary NTP Server or enter the IP address of your primary NTP server.
  1. (Optional) Enter a Secondary NTP Server address.
  2. (Optional) To authenticate time updates from the NTP server(s), for Authentication Type, select one of the following for each server:

    • None—(Default) Disables NTP authentication.
    • Symmetric Key—Firewall uses symmetric key exchange (shared secrets) to authenticate time updates.
      • Key ID—Enter the Key ID (1-65534).
      • Algorithm—Select the algorithm to use in NTP authentication (MD5 or SHA1).
    • Autokey—Firewall uses autokey (public key cryptography) to authenticate time updates.
  3. Click OK.
INDIA NTP Server Address
  •    server 0.in.pool.ntp.org
  •    server 1.in.pool.ntp.org
  •    server 2.in.pool.ntp.org
  •    server 3.in.pool.ntp.or
 
Google Public NTP [AS15169]:
  • time.google.com
  • time1.google.com
  • time2.google.com
  • time3.google.com
  • time4.google.com
 
Public Amazon Time Sync Service [AS16509, AS14618, AS399991]:
  • time.aws.com
  • amazon.pool.ntp.org
  • 0.amazon.pool.ntp.org
 
Cloudflare NTP [AS13335]:
  • time.cloudflare.com
 
Facebook NTP [AS32934]:
  • time.facebook.com
  • time1.facebook.com
  • time2.facebook.com
 
Microsoft NTP server [AS8075]:
  • time.windows.com
 
Apple NTP server [AS714, AS6185]:
  • time.apple.com
  • time1.apple.com
  • time2.apple.com

How traffic pass Inside to Outside & get internet

  • Zone
  • Interface Configure & IP Address
  • NAT
  • Security Policy 
  • Virtual Router

IPV4 Address Configure

  • Outside Wan Interface IP 192.168.247.55/24
  • Same Way Configure Inside Lan Interface IP 172.17.1.1/24  

Zone Configuration

  • Security Zone Then Click New Zone – Inside Then Ok
  • Security Zone Then Click New Zone – Outside Then Ok

Click Add Button For New Policy Create 

Paloalto CLI Commnd

 Paloalto Firewall First Managment Port Configration  
  1. show interfaces all
  2. show interfaces management
  3. configure mode
  4. set deviceconfig system type static
  5. set deviceconfig system ip address
  6. 192.168.1.101 netmask 255.255.255.0
  7. set deviceconfig system default gateway 192.168.1.1
  8. comnit
  9. show jobs all

Type of Interfaces in Palo Alto

Palo Alto Networks firewalls, interfaces ?

In Palo Alto Networks firewalls, interfaces can be categorized into several types, each serving different functions. Here are the main types of interfaces:

1. Physical Interfaces: These are the actual network ports on the firewall, used to connect to various network devices.


2. Virtual Interfaces: These allow you to create logical interfaces on top of physical interfaces. Examples include:

– Layer 2 Interfaces: Operate in a switching mode, allowing for VLAN configurations.
– Layer 3 Interfaces: Operate in a routing mode, with an IP address assigned for routing traffic.


3. Aggregate Interfaces: Combine multiple physical interfaces into a single logical interface to increase bandwidth and provide redundancy.


4. Subinterfaces: These are virtual interfaces created on a physical interface, allowing for traffic segregation (e.g., for VLANs).


5. Loopback Interfaces: These are virtual interfaces used primarily for testing and management purposes, providing a reliable point of connectivity.


6. Management Interface: A dedicated interface used for management access to the firewall, separate from data traffic.


7. HA Interfaces: Used in high availability (HA) configurations to synchronize data between primary and secondary firewalls.


8. Tunnel Interfaces: Used for VPN configurations, allowing encrypted traffic to flow between endpoints.

NAT(Network Address Translation)

PAT Diagram