Dual Boot Windows 10 and Ubuntu

Prerequisites

Most importantly, there are some things you must have in place if you want to use (and dual boot) Ubuntu and Windows 10 on the same PC:

  • A computer preinstalled with Windows 10
  • A partitioned hard drive
  • A BIOS in UEFI mode (Unified Extensible Firmware Interface)
  • An empty USB drive of at least 4Gig for creating a bootable disk
  • An internet connection to download Ubuntu ISO image (the Linux distro) and Rufus (a bootable drive creation tool)

How to Check If Your PC BIOS is in UEFI Mode

To check if your PC BIOS comes in UEFI mode, search for “system information” and hit ENTER.


Look under BIOS mode to confirm that your PC BIOS mode comes as UEFI.

If your PC BIOS is not in UEFI mode, the two operating systems won’t see each other.

How to Partition your Hard Drive for Ubuntu

You have to partition your hard drive because you must set aside at least 20Gig for Ubuntu to live in and boot from.

To partition your hard drive, follow the steps below:

Step 1: Right-click on Start and select “Disk Management”.

Step 2: Right-click on your C drive and select shrink volume.

Step 4 (optional): You can go ahead and assign a letter to the new volume. Right-click on the unallocated space and select “New Simple Volume”.

Step 5: Follow the wizard and assign a letter to the drive, then follow the rest of it.

After completing the wizard, the drive should be listed on your computer.

Congrats! You’ve successfully partitioned your hard drive.

N.B.: If you have a lot of free space in your hard drive but your PC still didn’t give you up to 20Gig partition space, then you need to optimize your PC’s hard drive. Proceed to the next section of this article to do that.

How to Optimize your Hard Drive for More Partition Space (Optional)

The common purpose of hard disk optimization is to speed up your computer during boot time and make it run smoother.

At the same time, the process will defragment the hard disk and make free space more available for partitioning.

To optimize your hard drive, click Start (Windows logo key), search for “defrag” and select “Defragment and Optimize Drives”.

Make sure your C drive is highlighted, then click “Optimize”.

After you’ve been able to set aside at least 20Gig for Ubuntu by partitioning your hard drive, then it’s time to download Ubuntu and make a bootable USB.

How to Download Ubuntu in ISO Image Format

The next thing is to download Ubuntu in ISO image format so you can install Ubuntu. You can download it from the Ubuntu distro website.

After downloading Ubuntu, don’t do anything with it yet. You need to make a bootable USB and put it in there. That’s how you’ll be able to use it.

The reason you can’t install Ubuntu just like that is that it doesn’t come as an executable. It comes in form of ISO (optical disk image). That means you have to find a disk to put it in before it can work.

The next part of this guide shows how you can put the downloaded Ubuntu ISO on a USB stick.

How to Make an Ubuntu (Linux) Bootable USB Drive

You won’t be able to make a bootable USB drive for Ubuntu by just placing the downloaded ISO image in it. Follow these steps to get it done:

Step 1: You need to download a bootable USB drive creation tool like Rufus.

Step 2: Insert the empty USB drive into your Windows 10 PC. Right-click on Rufus and select “Open”.

Step 3: Under “Device”, select your USB drive. And under “Boot selection”, click the “Select” button and select the Ubuntu ISO file you downloaded

Step 4: Leave every other thing as default and click the “START” button to start burning the Ubuntu distro to the drive.

Step 5: Click OK to start the process.

Once the process is done, you should see “READY” on a green background. Click the Close button. Its time to install Ubuntu.

Congrats! Now you have a bootable drive with which you can install Linux.

The next step is to install the Ubuntu distro on your Windows 10 PC. To do this, you have to boot your PC from the bootable USB drive you created.

How to Install Ubuntu Linux Distro along with Windows 10

Step 1: Ensure the bootable drive is inserted into your Windows 10 PC

Step 2: Right-click on Start, hold SHIFT, and select Restart.

Step 2: Select “Use a Device”.

Step 3: On the next screen, you should see several devices you can boot from.

You may see the bootable drive as the name of the USB brand.

It’s possible to see it as “Ubuntu” too. Some other times, you might not see it, so you need to click on “See more devices”.

If you still cannot see your bootable drive, head over to your boot menu by getting into BIOS. You will see it there.

N.B.: You should be very careful while making changes in BIOS. Whatever you do there has a lasting effect on your computer. If you are not sure of what you’re doing there, you should contact an IT professional.

Step 4: Choose “Install Ubuntu”. You can also try it before installing it.

Click OK to select all the space in the partition.

This time around, the “Install now” button will not be greyed out anymore.

Follow other prompts until Ubuntu starts installing.

After the installation is done, Ubuntu will prompt you to remove the bootable drive and press ENTER to reboot your Computer.

Now You Can Dual Boot Ubuntu and Windows 10

Immediately after you reboot the computer, you should see a screen that looks as shown below:

Now, you can select which one to boot into between Ubuntu and Windows 10.

To boot into Ubuntu, select Ubuntu. And to boot into Windows 10, select Windows boot manager.

You can also get into your BIOS from the same place by choosing UEFI Firmware Settings.

Follow other prompts of the installation wizard and make sure you don’t replace your Windows 10 OS installation with Ubuntu. This is why I suggested you back up all your files.

When you get to the point to select the partition you made, scroll to the partition you made earlier and press ENTER.

3. Select your keyboard layout

Click Install Ubuntu and then (in the resulting window) select the keyboard layout and click Continue.

4. Enable third-party software

In the next screen, click the check box for Install third-party software for graphics and Wi-Fi hardware and additional media formats. This option will install several codecs so you can play numerous media files.

5. Install

Click Continue and, in the next window, keep all of the defaults and click Install Now.


6. Confirm the installation

You will then be prompted to proceed with the installation.


7. Configure your location

In the next window, either select on the map or type your location and click Continue.


8. Configure your user

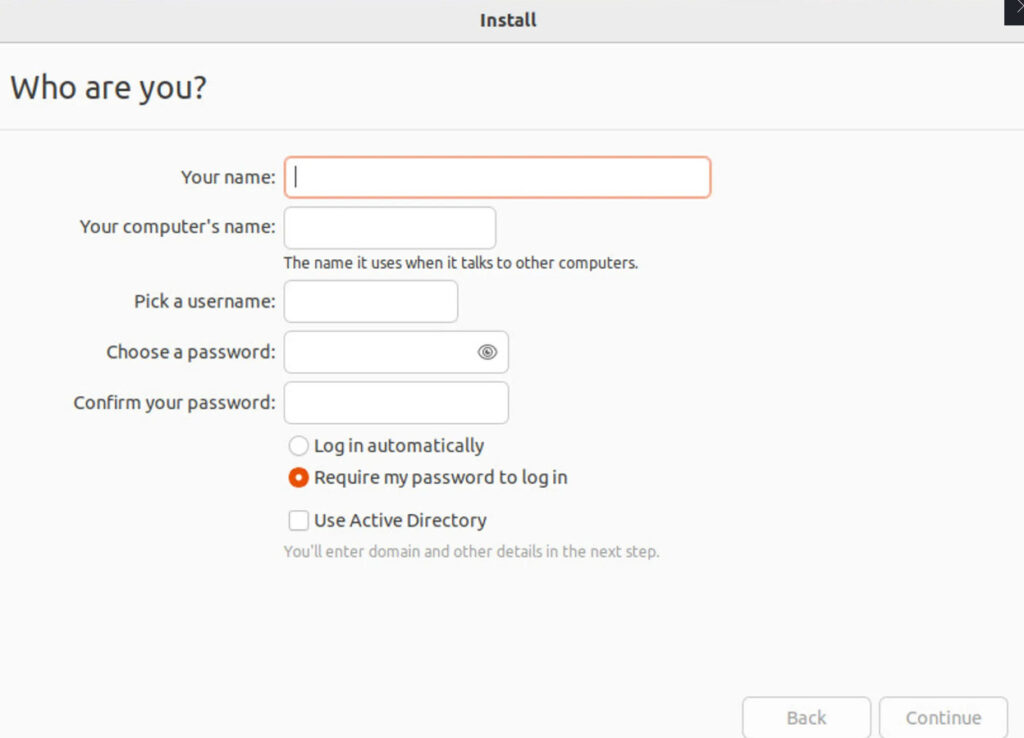
Next, you must create a user for the system. Type your full name, a name for the computer (which can be anything you like, such as ubuntulinux), a username, and a password. 

Make sure to keep Require my password to login checked (otherwise your system will be less secure). Click Continue and the installation will begin. It should take at the most five minutes to complete the process (depending on the speed of your network and system).

9. Restart

When the installation completes, you’ll be prompted to restart the computer.


10. Remove the USB device

Finally, you’ll be prompted to remove the installation media (the USB drive) and hit Enter on your keyboard.


11. Login

When the machine reboots, you’ll be greeted by the login screen. Enter the username and password you created during installation and enjoy Ubuntu Desktop Linux.