- 8777701917
- info@saikatinfotech.com
- Basirhat W.B

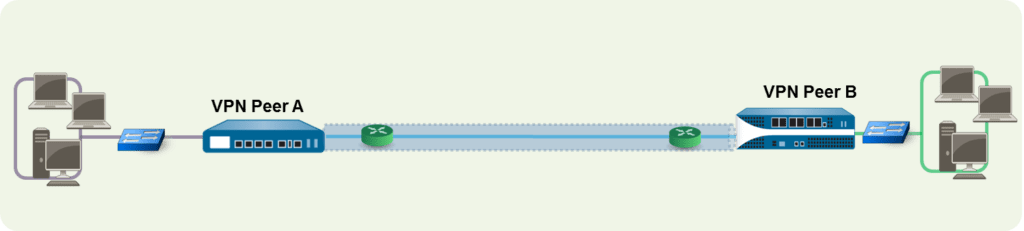
Virtual private network (VPN) helps you to establish a secure network connection when using public networks. VPNs encrypt your internet traffic and hide your identity in the internet. This makes the location invisible and makes it more difficult for third parties to track your activities in the internet and steal data. A VPN connection is also secure against external attacks from bad actors in the internet as only you can access the data in the encrypted VPN tunnel.
Tunnel Interface
To set up a VPN tunnel, the Layer 3 interface at each end must have a logical tunnel interface for the firewall to connect to and establish a VPN tunnel. A tunnel interface is a logical (virtual) interface that is used to deliver traffic between the two endpoints. If you configure any proxy IDs, the proxy ID is counted toward any IPSec tunnel capacity.
The tunnel interface must belong to a security zone to apply a policy rule and it must be assigned to a virtual router in order to use the existing routing infrastructure. Ensure that the tunnel interface and the physical interface are assigned to the same virtual router so that the firewall can perform a route lookup and determine the appropriate tunnel to use.
Typically, the Layer 3 interface that the tunnel interface is attached to belongs to an external zone, for example the untrust zone. While the tunnel interface can be in the same security zone as the physical interface, for added security and better visibility, you can create a separate zone for the tunnel interface. If you create a separate zone for the tunnel interface, say a VPN zone, you’ll need to create security policies to enable traffic to flow between the VPN zone and the trust zone.
To route traffic between the sites, a tunnel interface doesn’t require an IP address. An IP address is only required if you want to enable tunnel monitoring or if you’re using a dynamic routing protocol to route traffic across the tunnel. With dynamic routing, the tunnel IP address serves as the next hop IP address for routing traffic to the VPN tunnel.
If you’re configuring the Palo Alto Networks firewall with a VPN peer that performs policy-based VPN, you must configure a local and remote proxy ID when setting up the IPSec tunnel. Each peer compares the proxy IDs configured on it with what is received in the packet to allow a successful IKE phase 2 negotiation. If multiple tunnels are required, configure unique proxy IDs for each tunnel interface; a tunnel interface can have a maximum of 250 proxy IDs. Each proxy ID counts toward the IPSec VPN tunnel capacity of the firewall, and the tunnel capacity varies by the firewall model.
IPSec VPN Types
IPSec VPN Tunnels
gets implemented depends on the device platform. The access lists interpret IPSec policy rule to determine which traffic will be protected by IPSec.
Internet Key Exchange (IKE) for VPN
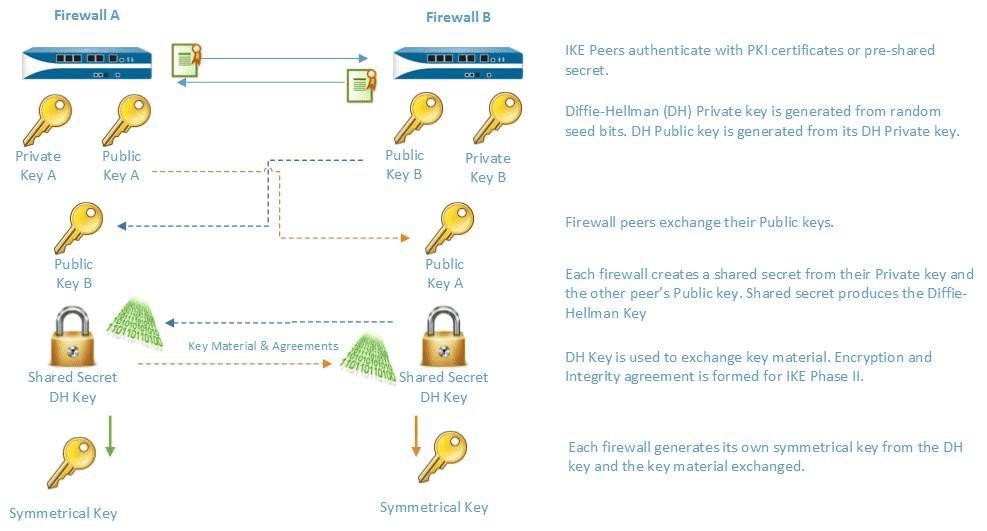
IKE Gateway
IKEv2
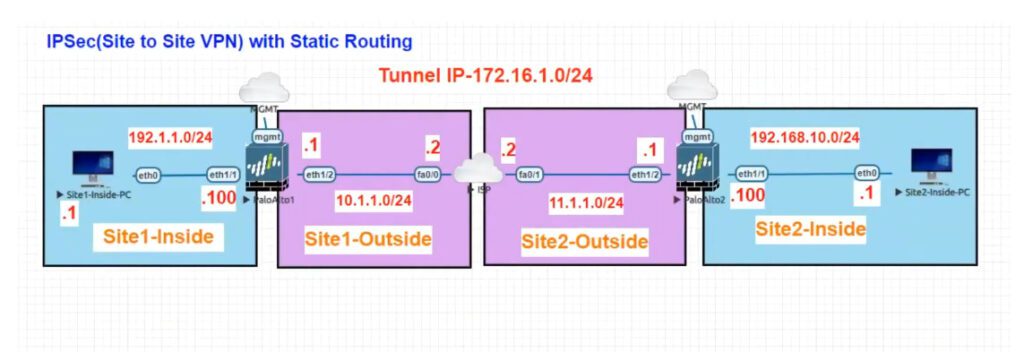
IPSec VPN (Site-to-Site)
Notes
If there’s a deny rule at the end of the security rulebase, intrazone traffic is blocked unless otherwise allowed. Rules to allow IKE and IPSec applications must be explicitly included above the deny rule.
Notes
If your VPN traffic is passing through (not originating or terminating on) a PA-7000 Series or PA-5200 Series firewall, configure a bidirectional Security policy rule to allow the ESP or AH traffic in both directions.
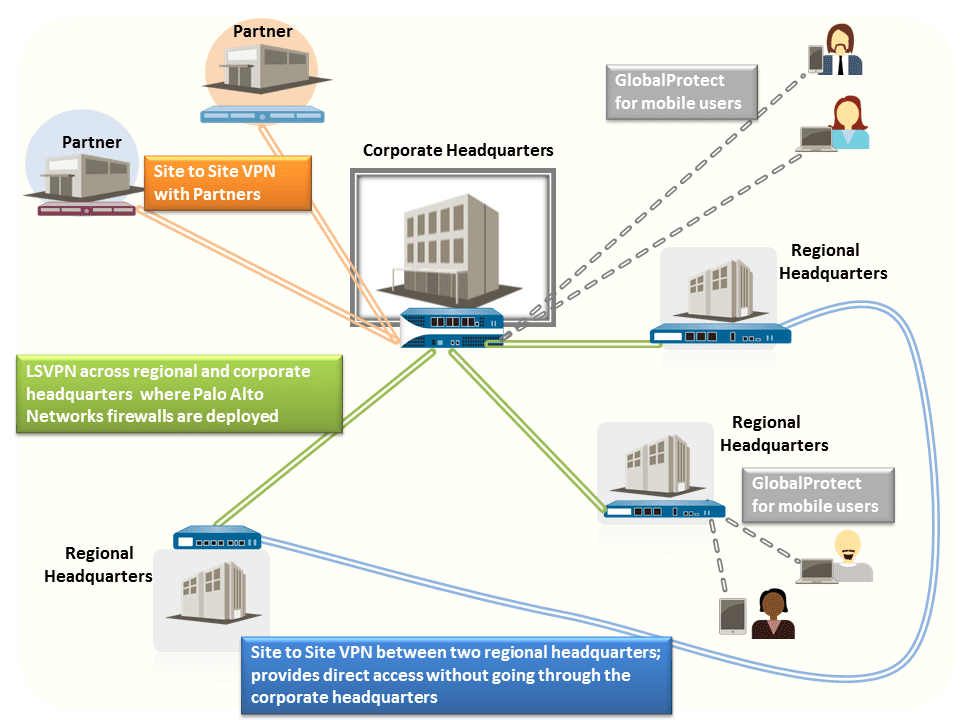
When these tasks are complete, the tunnel is ready for use. Traffic destined for the zones/addresses defined in a policy rule is automatically routed properly based on the destination route in the routing table, and handled as VPN traffic. For a few examples on site-to-site VPN, see Site-to-Site VPN .

Configuration Steps
Firewall No – 1
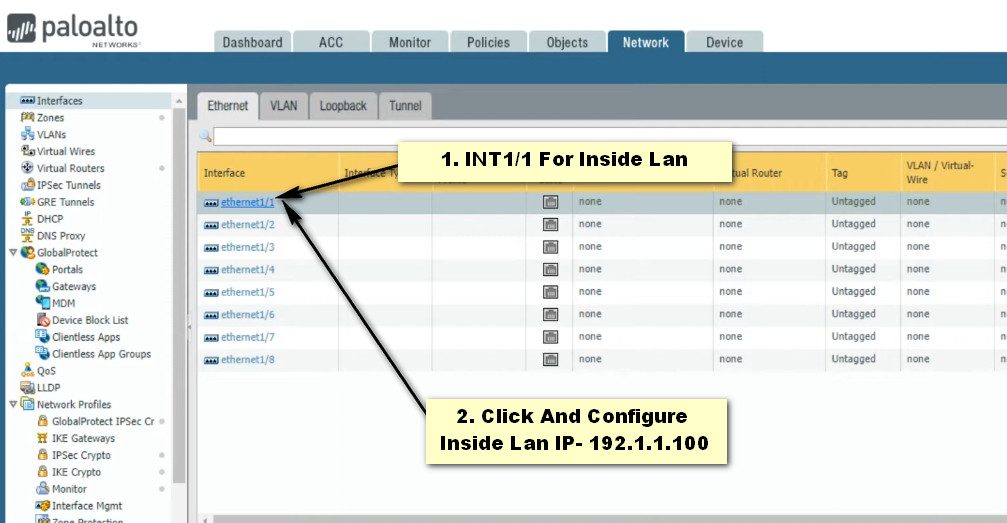
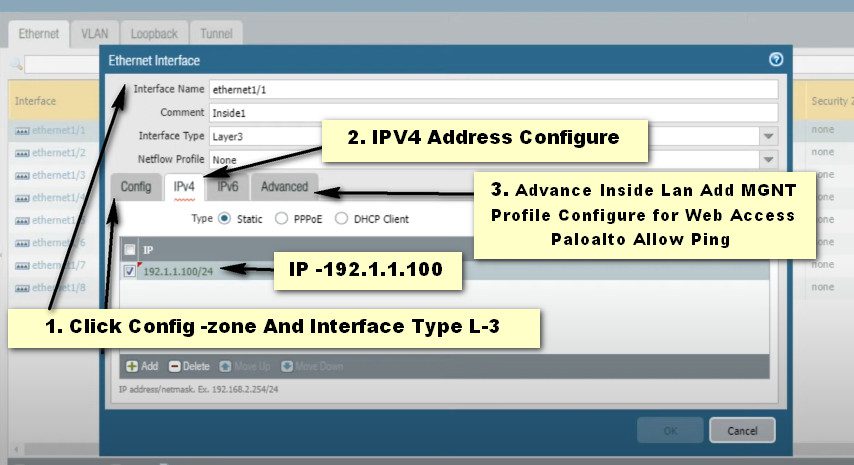
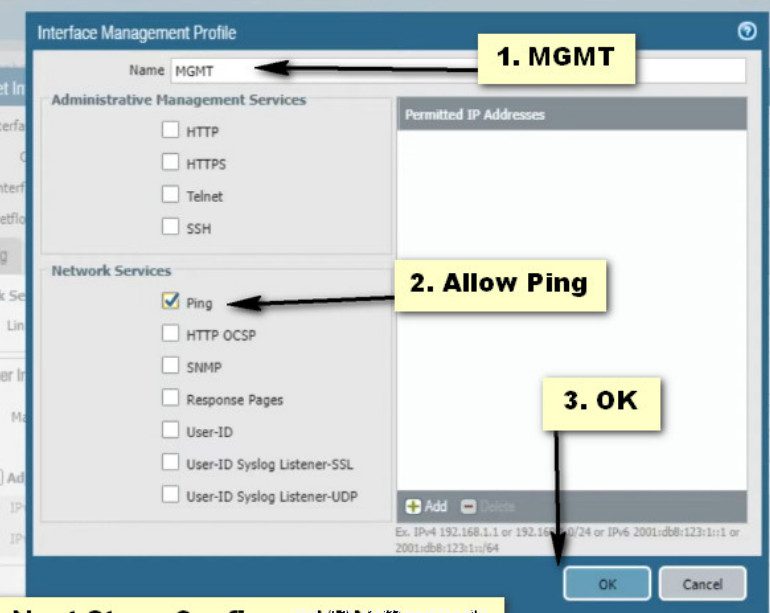
Step-1 Interfaces Configure
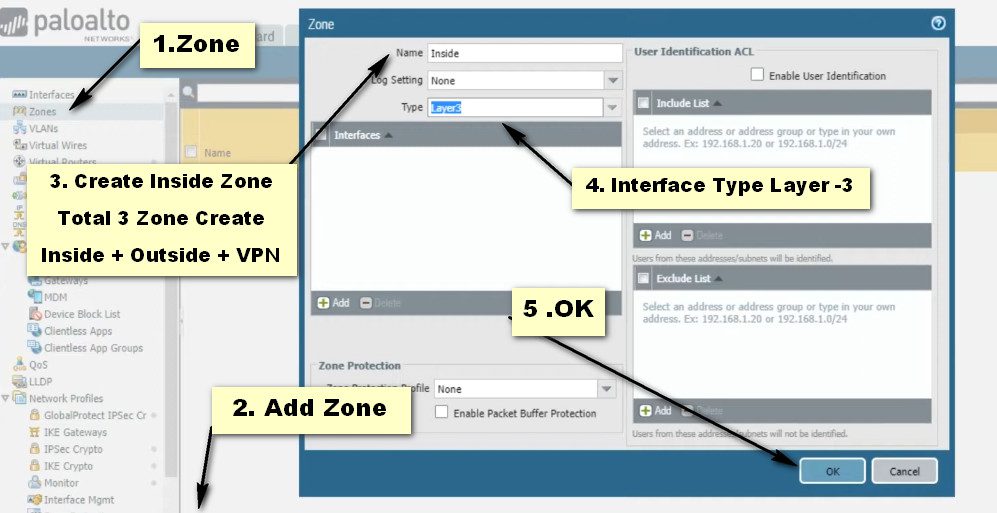
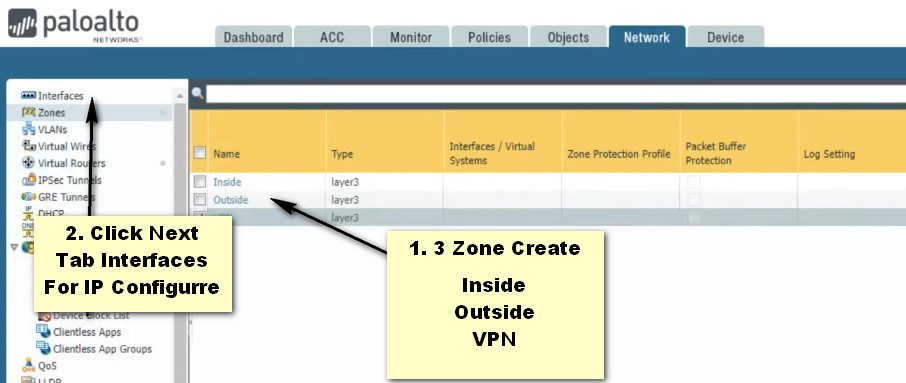
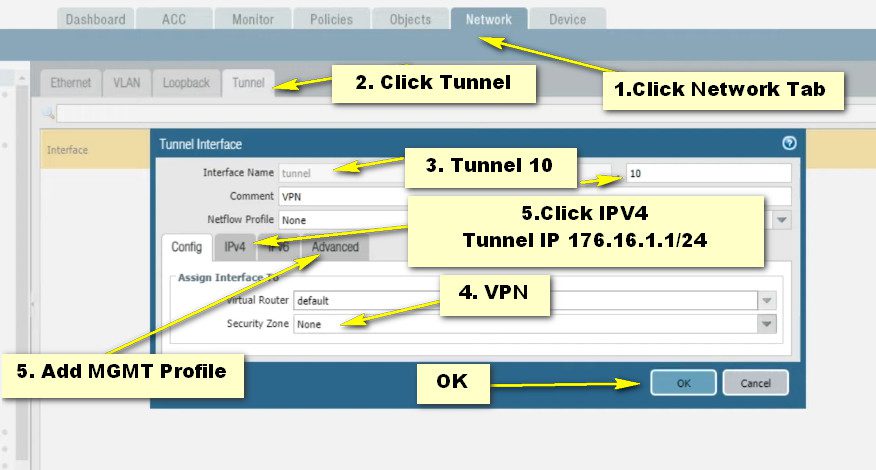
Step- 2 Interfaces Configure
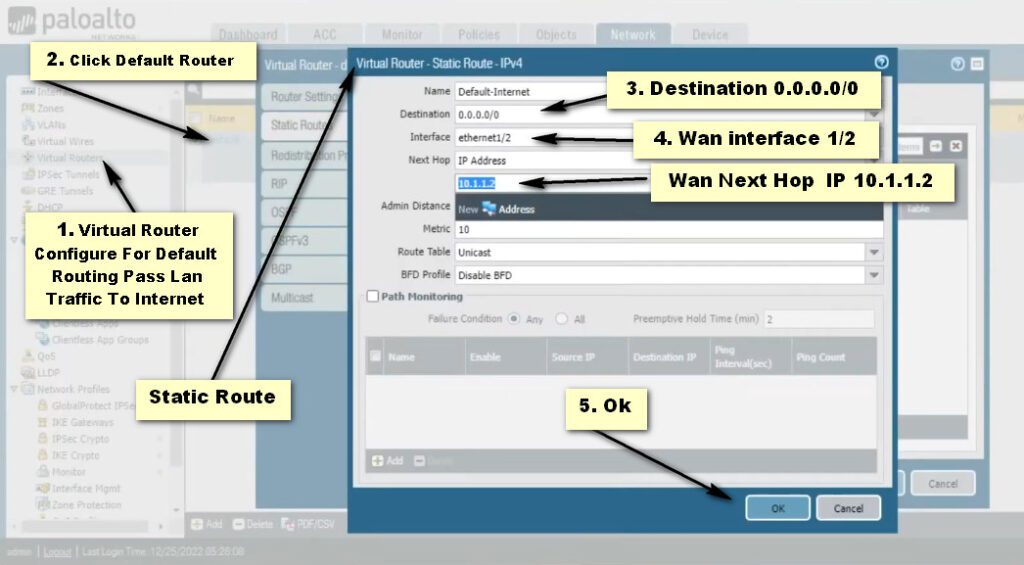
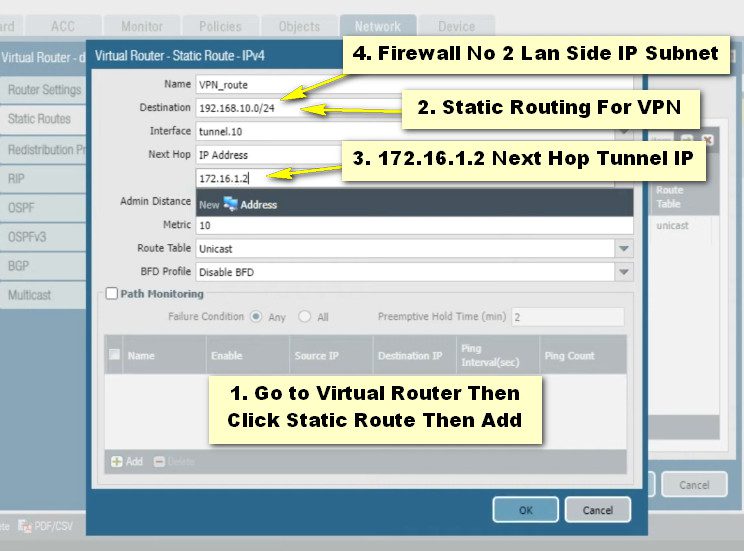
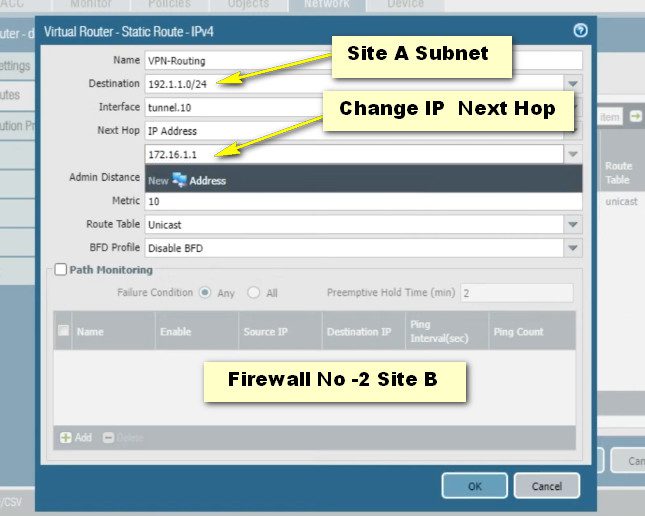
Step- 3 Static Routing
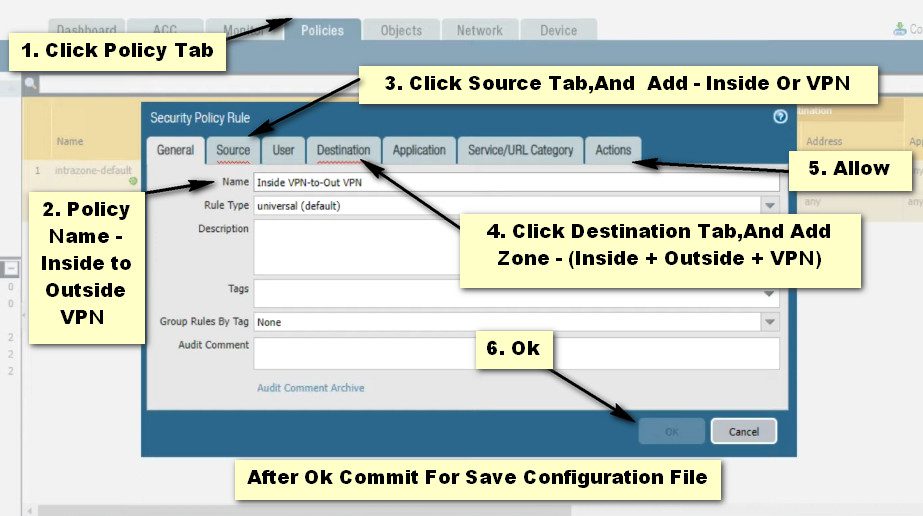
Step- 4 Security Policy
Same Configuration Firewall No – 2
Site To Site VPN Configuration Firewall No 1
Step -1 IKE-Cryptography

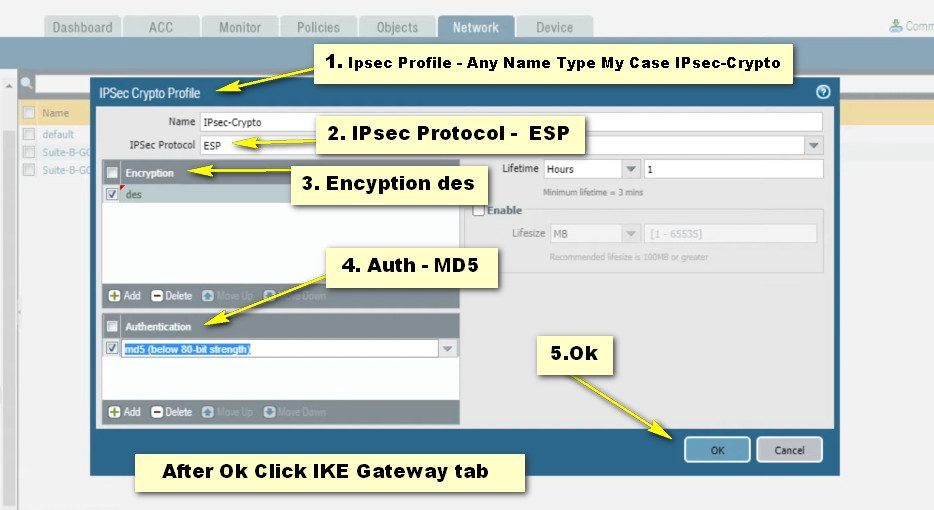
Step -2 IPsec-Crypto
Step -3 IKE-Gateway

Same Method Follow Configuration Firewall No – 2 Same Configuration Main Mode, Des,Md5,Pre-shared Key 123 Changes Only Peer address – Firewall No 1 Wan Public IP And Peer Identification Address Firewall No -1 Public IP

Ok And Commit Save Config File
Site A Firewall No -1 Route Configuartion
Step- 4 IPsec-Tunnel
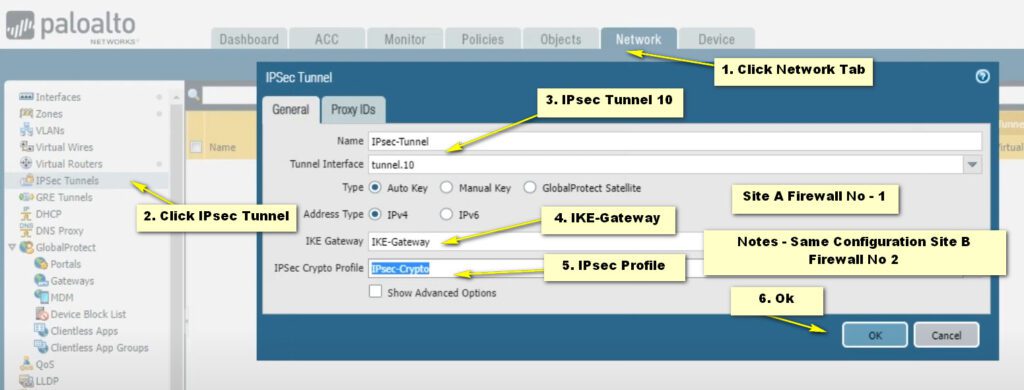
After Ok Commit.IPsecvpn Ready To Use