What is Dell iDRAC

Dell iDRAC (Integrated Dell Remote Access Controller) is a proprietary hardware and software solution by Dell that allows remote management of Dell servers. It provides administrators with out-of-band management capabilities, meaning that even if the server’s operating system is down or unresponsive, the administrator can still manage and troubleshoot the server remotely. iDRAC is integrated directly into the motherboard of Dell servers and is typically used in enterprise environments.


Here are the key features of Dell iDRAC:

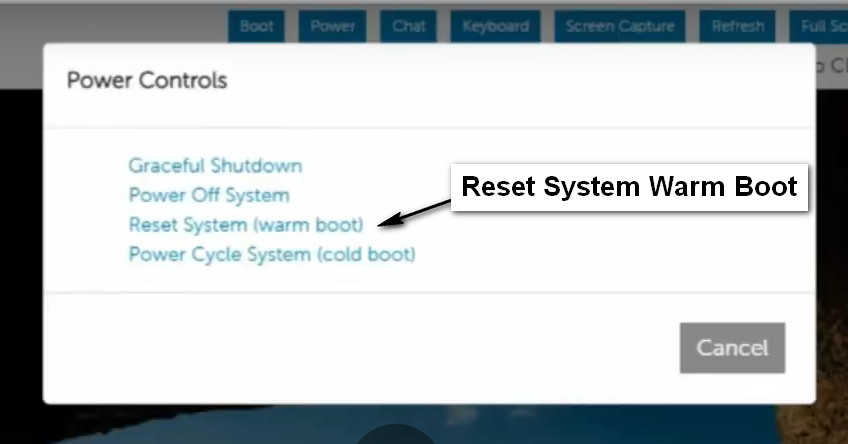
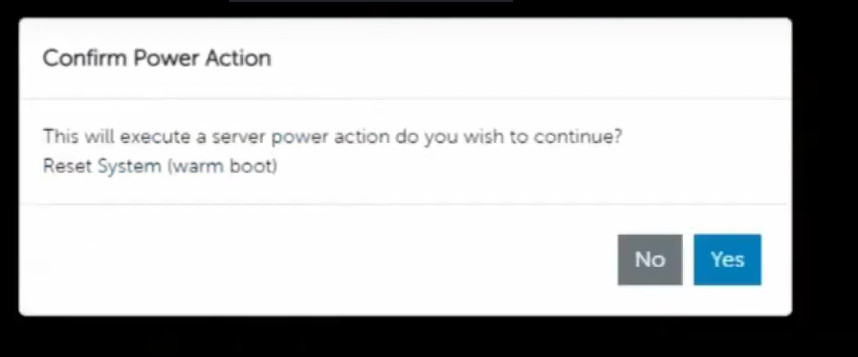
  1. Remote Server Management: iDRAC allows administrators to remotely monitor, manage, and troubleshoot servers without needing physical access. This includes power cycling, rebooting, and viewing server logs.

  2. Hardware Monitoring: It provides real-time monitoring of the server’s hardware, including CPU temperature, fan speeds, power usage, and memory status.

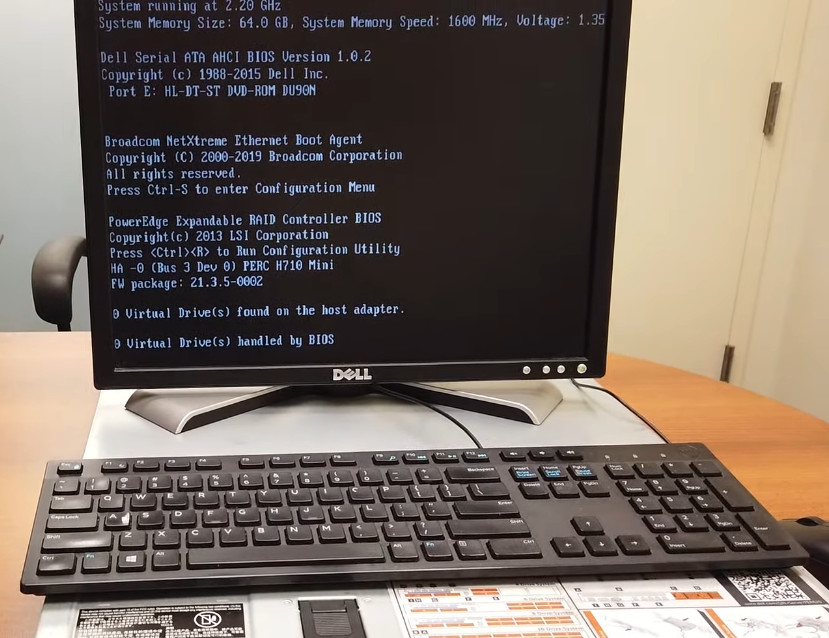
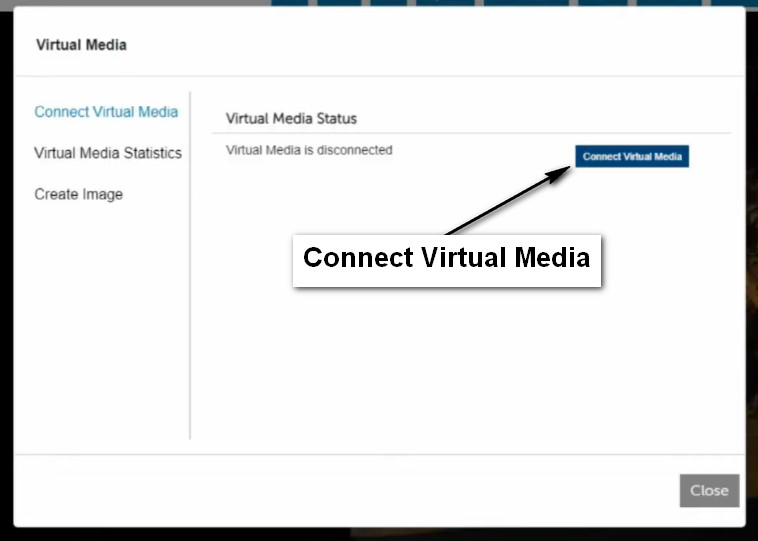
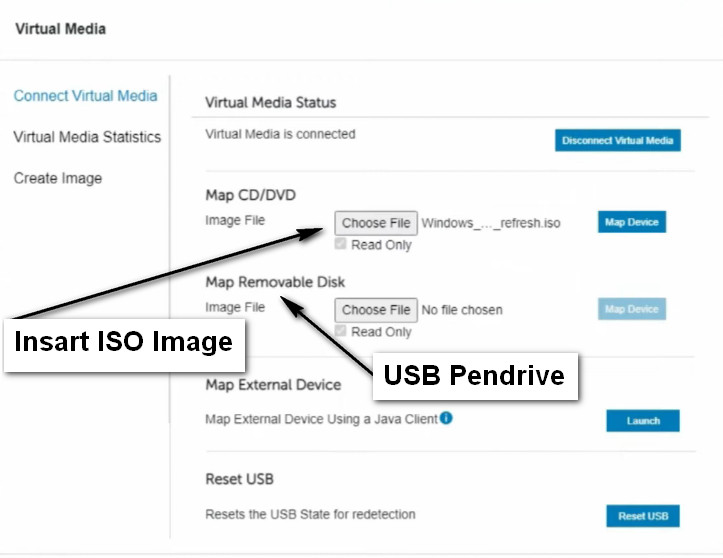
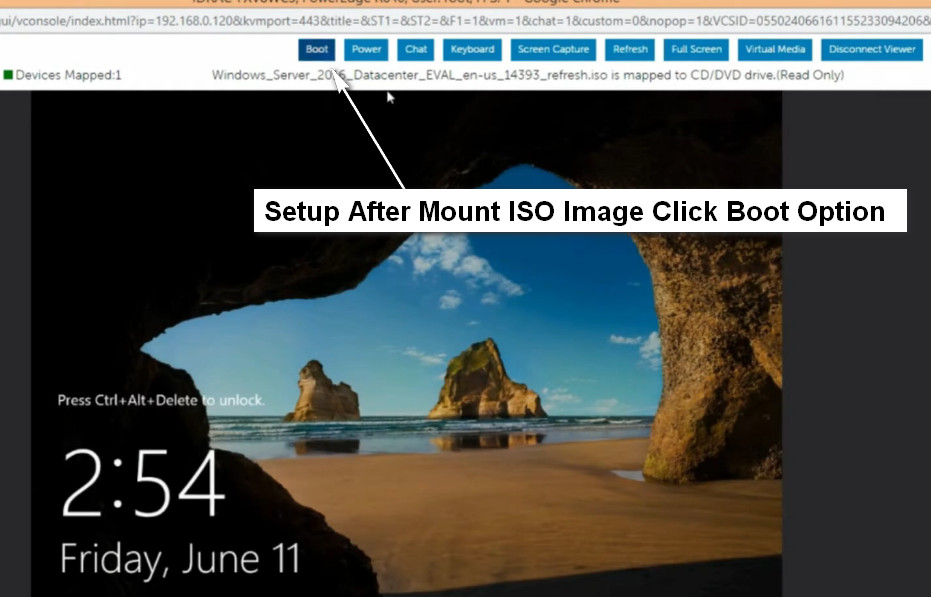
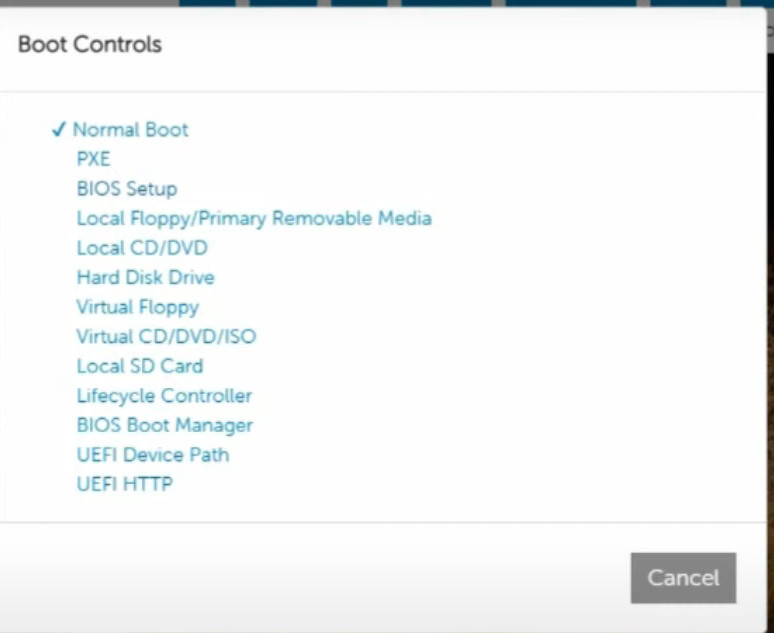
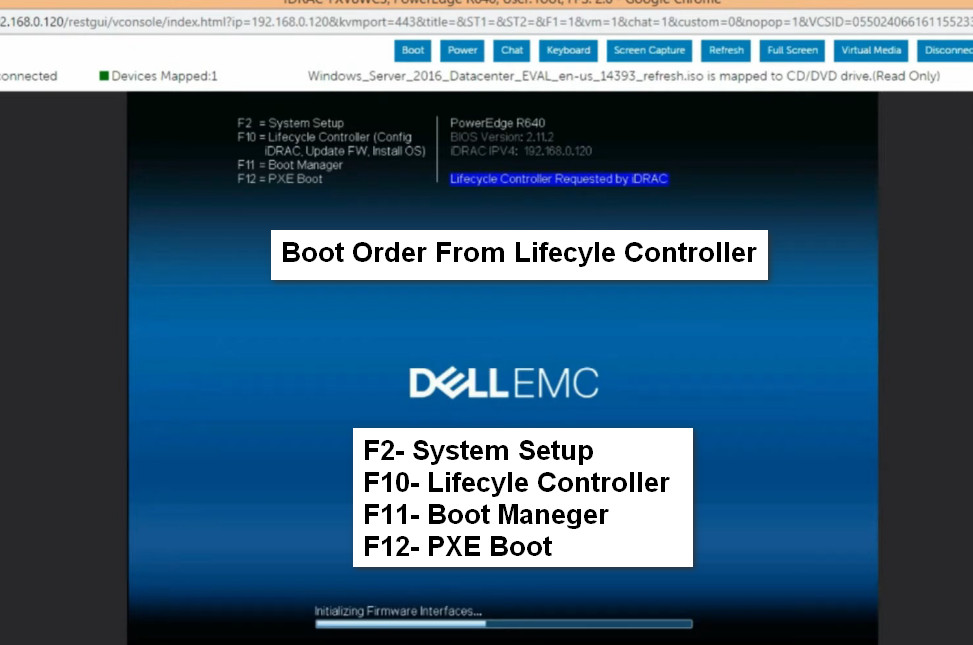
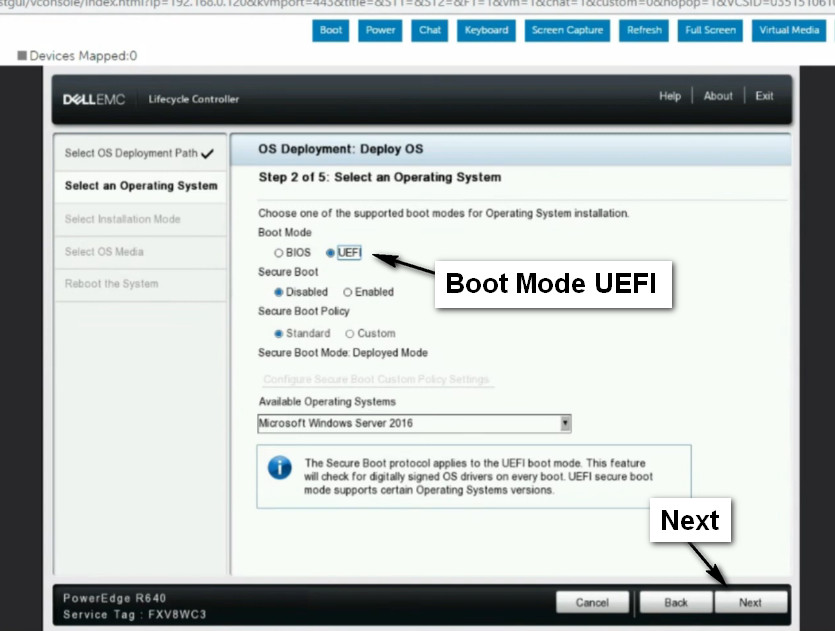
  3. Virtual Console Access: Administrators can access the server’s console remotely, similar to being physically at the machine. This allows for BIOS configurations, OS installations, and troubleshooting in case of OS failure.

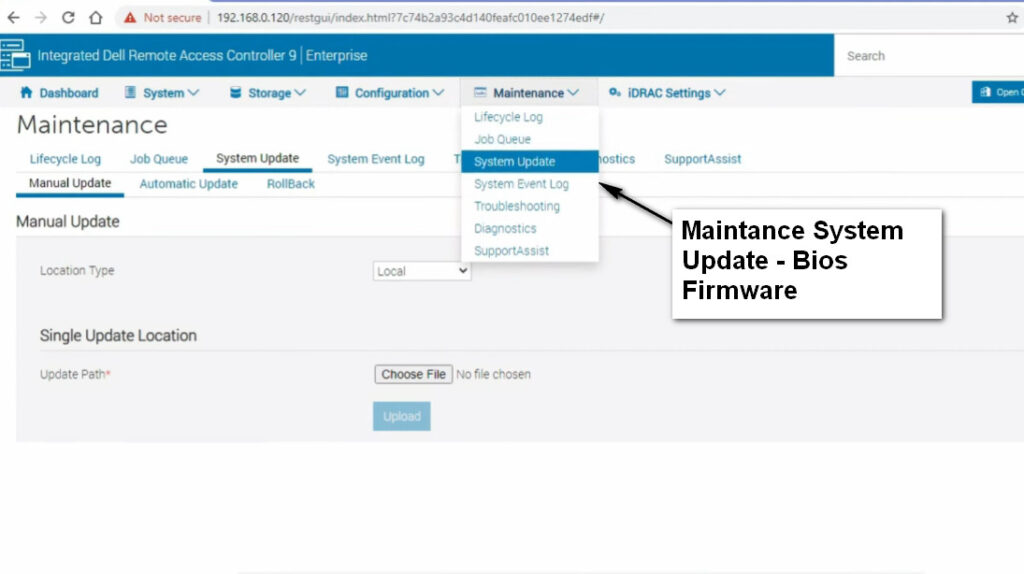
  4. Firmware Updates: iDRAC can be used to remotely update the server’s firmware, ensuring that systems stay up to date with the latest patches and security fixes.

  5. KVM (Keyboard, Video, Mouse) Over IP: iDRAC offers KVM over IP functionality, enabling remote access to the server’s keyboard, video output, and mouse, allowing full control over the server.

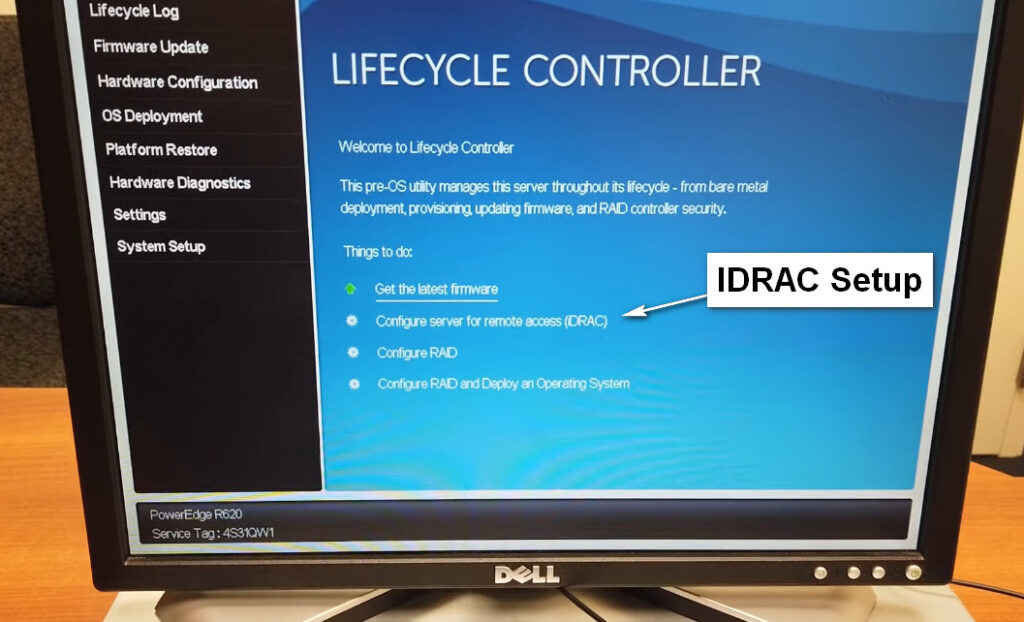
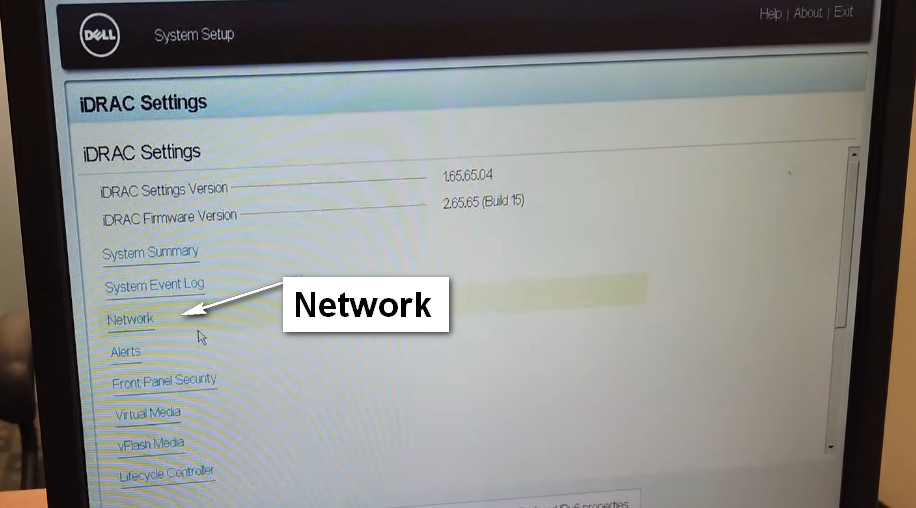
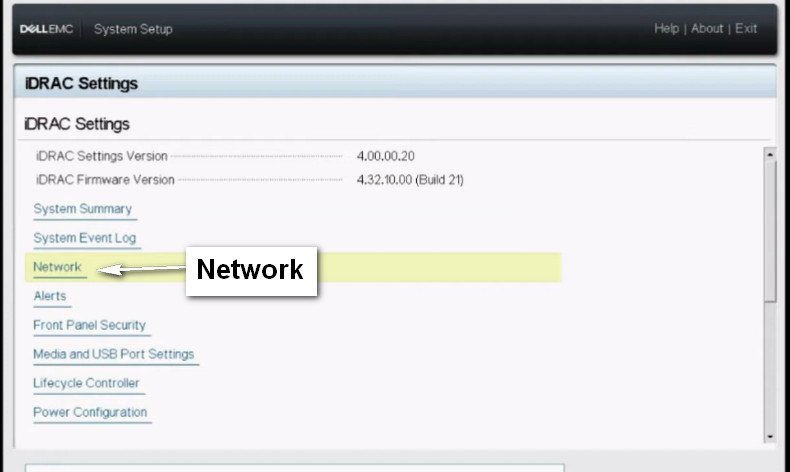
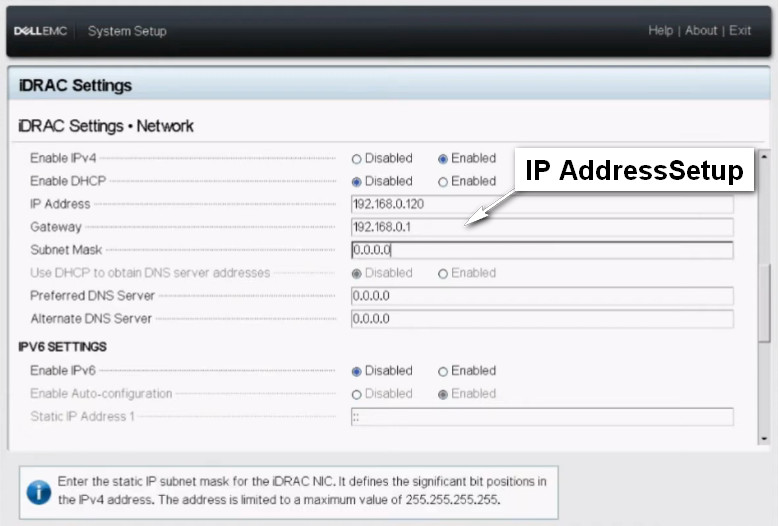
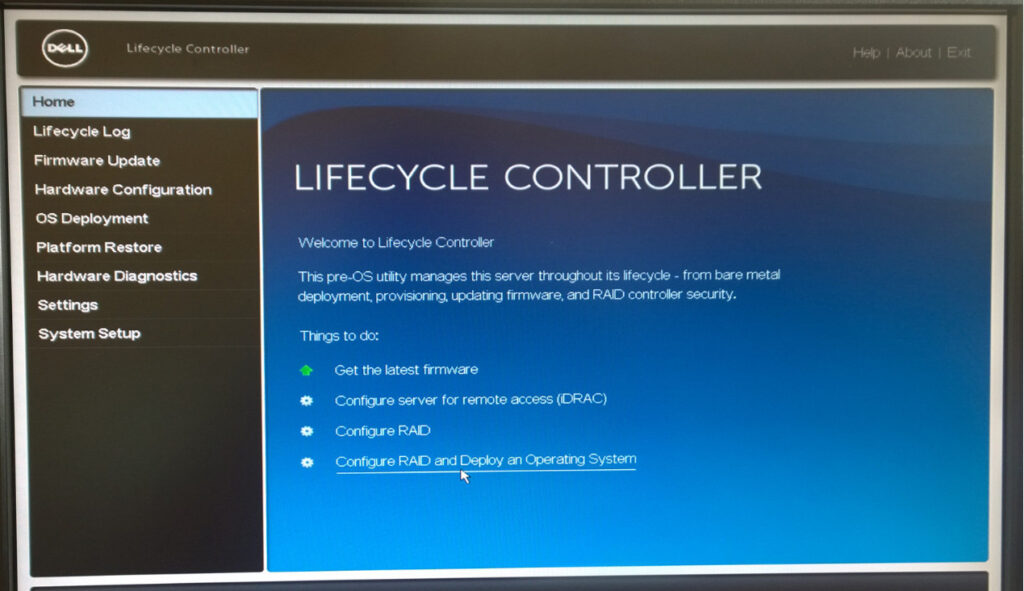
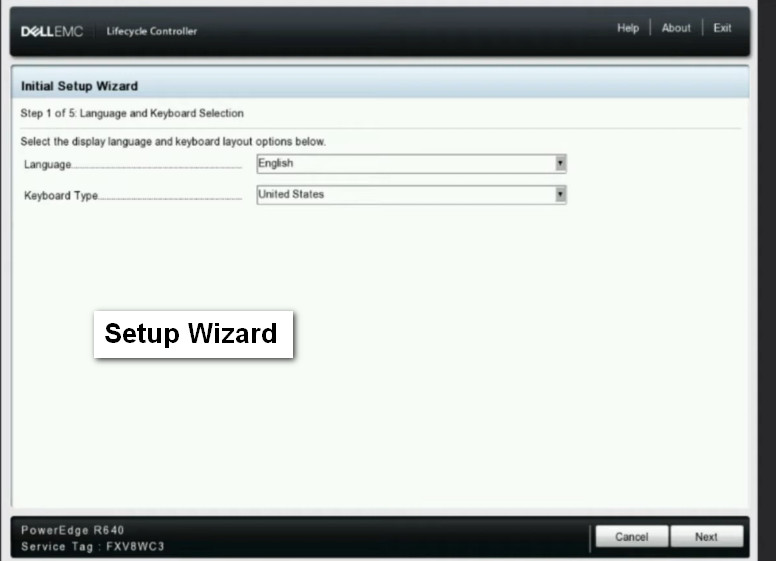
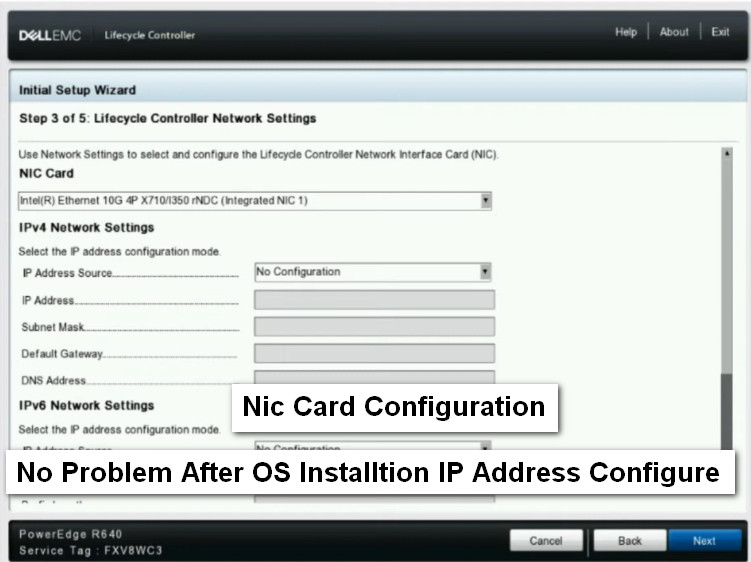
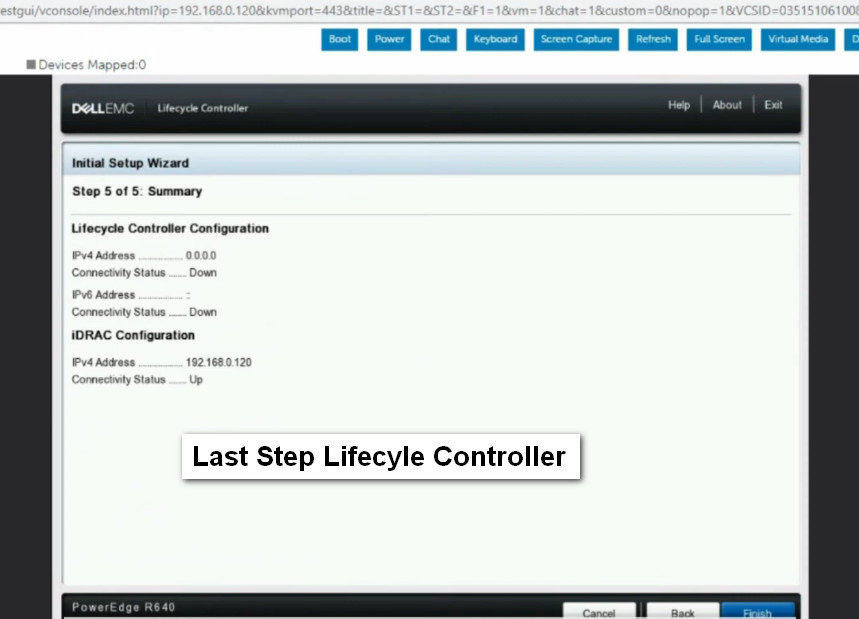
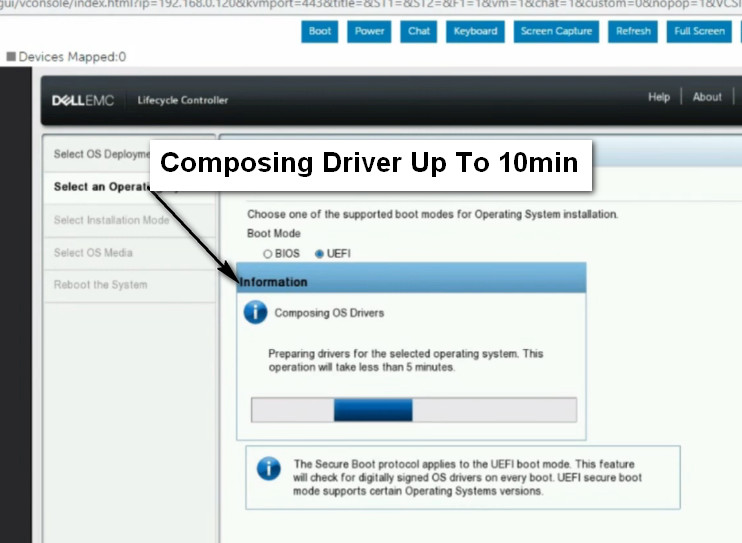
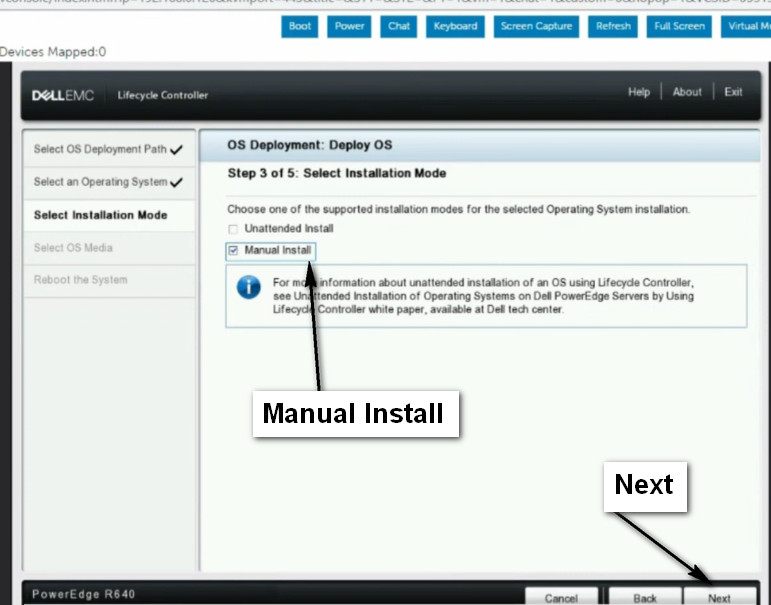
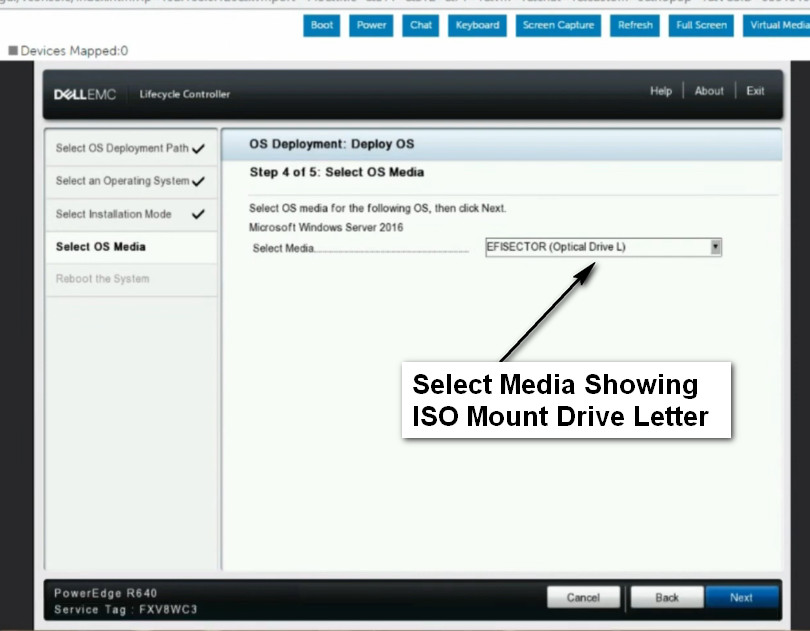
  6. Lifecycle Controller: iDRAC includes a feature called the Lifecycle Controller, which helps with the deployment, configuration, and management of Dell servers, providing a centralized interface for server setup and maintenance.

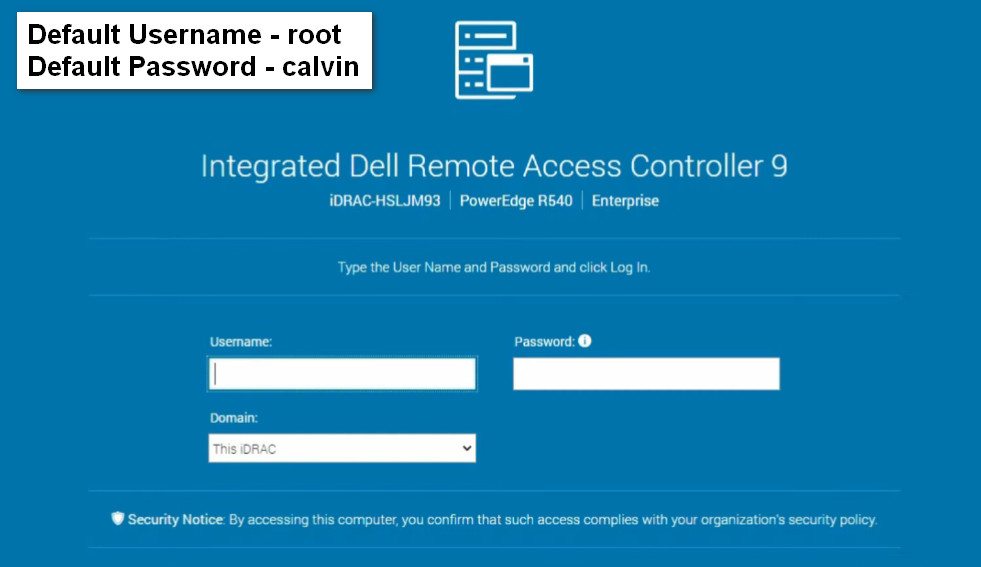
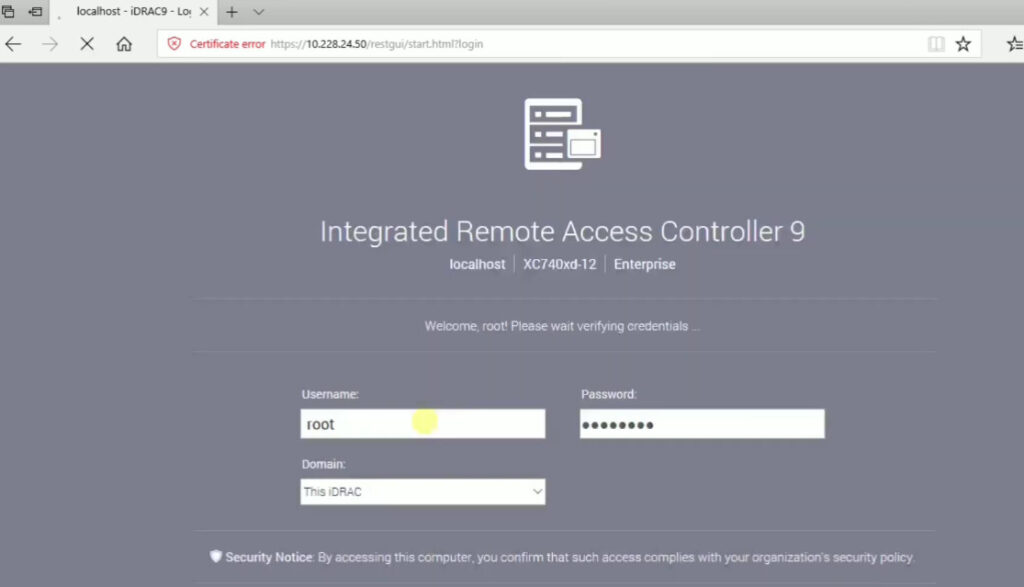
  7. Secure Access: iDRAC supports secure login methods, including username/password authentication, as well as integration with LDAP or Active Directory.

  8. Alerts and Notifications: iDRAC can send alerts (email, SNMP traps) when it detects hardware issues like fan failures, temperature anomalies, or disk failures.

Versions and Licensing:

Dell iDRAC comes in different versions (iDRAC Express, iDRAC Enterprise), with the Enterprise version offering more advanced features like remote media support, higher performance, and more comprehensive monitoring tools. Some of these features may require an additional license.

Overall, iDRAC is a powerful tool for managing Dell servers, providing flexibility and ensuring continuous uptime, which is crucial for mission-critical environments.

Dell Lifecycle Controller

The Dell Lifecycle Controller is a feature built into Dell servers that simplifies and automates many aspects of the server lifecycle, including deployment, configuration, updates, and maintenance. It is tightly integrated with Dell’s Integrated Dell Remote Access Controller (iDRAC) and provides an out-of-band management solution that helps administrators manage servers without needing physical access to the hardware. The Lifecycle Controller is part of the server’s firmware and offers a centralized interface for server management.

Key Features of the Dell Lifecycle Controller:

  1. Unified Management Interface:

    • The Lifecycle Controller provides a single interface for all server management tasks, including hardware configuration, operating system installation, and firmware updates. This makes it easier for administrators to perform tasks efficiently without having to rely on separate tools or manually interacting with each component.
  2. Server Deployment:

    • It allows administrators to quickly deploy operating systems on new or existing Dell servers. The Lifecycle Controller can be used to install a variety of operating systems, including Windows, Linux, VMware, and others, with minimal user intervention.
  3. Hardware Configuration:

    • The Lifecycle Controller enables the configuration of various hardware components, such as RAID arrays, BIOS settings, and network settings. It automates many aspects of hardware configuration, reducing the time spent on setup and ensuring consistency.
  4. Firmware and Driver Updates:

    • The controller allows for the management of firmware, BIOS, and driver updates, both from a local repository or by directly downloading them from Dell’s online repositories. This ensures that servers remain up-to-date with the latest fixes, security patches, and enhancements.
  5. System Diagnostics:

    • The Lifecycle Controller includes built-in diagnostic tools to help identify and troubleshoot hardware issues. It can run hardware diagnostics on the server to ensure that all components are functioning correctly and can help pinpoint the root cause of problems.
  6. Remote Management:

    • Since the Lifecycle Controller is integrated with iDRAC, it can be accessed remotely, allowing administrators to manage the server even when the operating system is not operational or if the server is not booting properly. This out-of-band management is especially useful for troubleshooting and performing maintenance without needing physical access.
  7. Provisioning and Recovery:

    • The Lifecycle Controller can be used for provisioning new servers, setting up RAID arrays, configuring storage, and setting up networking. It also facilitates disaster recovery, helping to restore servers to their previous configurations after hardware failures or system crashes.
  8. Secure Boot:

    • It supports Secure Boot functionality, which helps prevent unauthorized operating systems or boot loaders from running on the system, adding a layer of security to the server.

How the Dell Lifecycle Controller Works:

  • The Lifecycle Controller is embedded into the system firmware, and it can be accessed through the server’s F10 key during the boot process.
  • Once inside the Lifecycle Controller, administrators can perform various tasks via a graphical user interface (GUI) or command-line interface (CLI), depending on the configuration and preferences.

Benefits:

  • Streamlined Server Management: Simplifies and automates critical tasks across the server lifecycle, from deployment to updates and recovery.
  • Improved Efficiency: Speeds up the process of setting up, configuring, and maintaining servers, which reduces downtime and increases overall operational efficiency.
  • Enhanced Security: Facilitates updates to firmware and drivers, ensuring systems are secure and compliant with the latest patches.
  • Cost-effective: Reduces the need for physical intervention, travel, or external management tools, which can lower operational costs.

Conclusion:

The Dell Lifecycle Controller is an essential tool for simplifying server lifecycle management, ensuring servers are deployed, configured, maintained, and updated in an efficient and secure manner. Its integration with iDRAC makes it an essential feature for managing Dell servers in enterprise environments, allowing administrators to handle tasks remotely and without direct interaction with the server hardware.

Dell Server Deploy OS by IDRAC

Deploying an operating system (OS) using Dell iDRAC is a process that involves using iDRAC’s remote management capabilities, which can help you install the OS on a Dell server without physical access to the machine. This can be particularly useful in data centers or remote locations.

Here’s a step-by-step guide to deploy an OS using Dell iDRAC:

Prerequisites:

  1. Dell Server with iDRAC: Ensure that the server has a functional iDRAC (preferably iDRAC Enterprise for more advanced features).
  2. OS Installation Media: Have the OS installation media (ISO file or bootable USB) available.
  3. Network Connectivity: Ensure that iDRAC is accessible over the network and is configured with the proper IP address.
  4. iDRAC License: iDRAC Enterprise license is required for advanced features like virtual media.

Steps to Deploy OS Using iDRAC:

1. Access iDRAC Web Interface:

  • Open a web browser and enter the iDRAC IP address.
  • Log in with your username and password. The default username is usually root, and the default password is calvin unless it was changed during server setup.

2. Launch Virtual Console:

  • Once logged into iDRAC, go to the “Remote Control” section in the menu.
  • Click on “Launch Virtual Console”. This opens a new window that gives you access to the server’s console, just like being physically in front of the machine.

3. Mount OS Installation Media:

To install the OS, you need to mount the OS installation media (ISO file or bootable USB) to the server using iDRAC.

  • For ISO Installation:

    • In the Virtual Console window, click on the “Virtual Media” tab.
    • Choose “Connect Virtual Media” to open the Virtual Media menu.
    • Under the “Mapped Devices” section, click “Add Image” and browse to the ISO file of the operating system you want to install. Select the ISO file and click “Open”.
    • The ISO image will now be mounted to the server as a virtual CD/DVD drive.
  • For USB Installation:

    • If you are using a physical USB drive, ensure that the server is configured to boot from the USB drive (you may need to modify the boot order in the BIOS).
    • You can also mount USB devices through iDRAC using the “Virtual Media” section.

4. Reboot the Server and Enter BIOS/Boot Menu:

  • In the Virtual Console window, reboot the server by either selecting the “Power” option and choosing “Reboot” or by using the Ctrl+Alt+Del command within the console.
  • As the server restarts, press the appropriate key to enter the BIOS or Boot Menu (usually F2 for BIOS or F11 for Boot Menu, depending on your server model).
  • If you’re using an ISO, make sure the server is set to boot from the virtual CD/DVD drive (the mounted ISO) or USB device.

5. Select the Boot Device:

  • In the Boot Menu, select the Virtual CD/DVD (for ISO) or the USB device (for physical USB media) as the first boot option.
  • Press Enter to proceed.

6. Install the Operating System:

  • The server will now boot from the selected OS installation media.
  • Follow the standard installation procedure for the OS you’re deploying (e.g., Windows Server, Linux, etc.).
  • The installation process will guide you through partitioning the disk, configuring settings, and installing drivers.

7. Complete OS Installation:

  • Once the OS installation is complete, the server may automatically reboot.
  • Remove the virtual media (ISO or USB) from the virtual media settings in iDRAC to avoid booting from it again.
  • The server will now boot from the newly installed OS.

8. Post-Installation Configuration:

  • After the OS installation is finished, you may need to configure the server (e.g., setting up network settings, users, and domain settings).
  • You may also need to install additional drivers, which can be done using Dell’s OpenManage software or directly from the Dell support website.

Using iDRAC for Remote OS Installation:

The key feature of iDRAC that makes OS deployment easier is the Virtual Console and Virtual Media options. With these tools, even without physical access to the server, you can install or reinstall the operating system, manage BIOS settings, and troubleshoot hardware without leaving your office or data center.

Advantages of Deploying an OS via iDRAC:

  • No Physical Access Required: You can deploy an OS remotely without needing to be near the server.
  • Automated OS Deployment: iDRAC allows for automated OS installation, especially when combined with tools like Dell OpenManage or automated scripting.
  • Centralized Management: Manage multiple servers from a single location using iDRAC for tasks such as OS deployment, firmware updates, and system monitoring.

By using iDRAC, you can save time and effort in managing your Dell servers, particularly in large-scale or distributed environments.

Select Lifecycle Controller

Benifit Automatic Server Driver Install From Os Deploy from IDRAC Lifecylecontroler

Click OS Deployment  And Go Directly to OS Deployment

Select Manual Install Alredy ISO MountÂ